4 iSpring Learn Updates to Simplify Your Workflow and Motivate Your Team
Say goodbye to routine processes and focus on what truly matters! With the latest iSpring Learn LMS updates, repetitive tasks take less time, training management is more straightforward, and navigation is seamless. And that’s not all — now you have another way to boost employee motivation!
Read on to learn about all the latest updates and where to find them.
Future Scheduled Courses Viewable in User Information
Before this update, administrators had to open each course individually to check future training and reenrollment. Now, all past, current, and upcoming enrollments are in User Information to make tracking and managing user progress easier. Plus, administrators will always have instant insights into training schedules and can be sure that no enrollment is missed.
Where to view future scheduled courses
Go to Enrolled Learning in User Information to see upcoming course enrollments and automatic reenrollment dates. You can find the date when a user enrolled in a content item under the Enrolled tab.
-1739359608.png)
Where to find the Enrollment Date in the User Information section
To view the automatic reenrollment date, navigate to the Completed tab. The reenrollment date will appear after the course has been completed.
-1739357994.png)
Where to find the Reenrollment Date in the User Information section
Future enrollments are also available in Learner Progress, Learner Results, and Course Progress reports. There, you can filter and analyze training schedules.
- In the Learner Progress report, you can view the columns with the start date and reenrollment date. Enable them in the Display Columns settings:
-1739357725.png)
- To view the start and reenrollment dates in the Learner Results report, enable these columns in the Display Columns settings:
-1739357879.png)
- In the Course Progress section, apply the Reenrollment Date filter to see the dates:
-1739357894.png)
Time-Limited Access Option for Exported Pages
Want to offer limited-time course access without the hassle of manual tracking? Now, when exporting pages to SCORM and xAPI, you can set an expiration date to manage content access better.
Agencies can now automate client subscription management, ensuring that access ends when the subscription expires. This also allows course developers to be more flexible with clients when offering them content subscription options.
How to set expiration dates when exporting pages
To set time-limited access to multiple pages, go to Learning Content, select the pages, and click on Export.
-1739358042.png)
In the Export content tab, choose an LMS profile, set a time period, and toggle Time-Limited Access on.
-1739358103.png)
Click on Export, and the pages will only be available for the specified time.
New Feature: Awards Page
Celebrate employees’ professional achievements and recognize their successes at work! Previously, employees only received awards for training. But now you can reward employees for every outstanding performance with the new Awards Page in iSpring Learn.
-1739358156.png)
Celebrate your employees’ achievements.
How to enable and view corporate awards
By default, the Awards section is disabled, but you can create awards first and then enable the section when they’re ready. To do this, go to the settings, open the Additional Options menu, and find the Awards section:
-1739358246.png)
Click on Enable, confirm your choice, and that’s it! Now you can see all existing awards in the Awards section of the User Portal.

All employees can see the awards that have been given and their recipients throughout the entire company, but you can adjust privacy settings if needed:
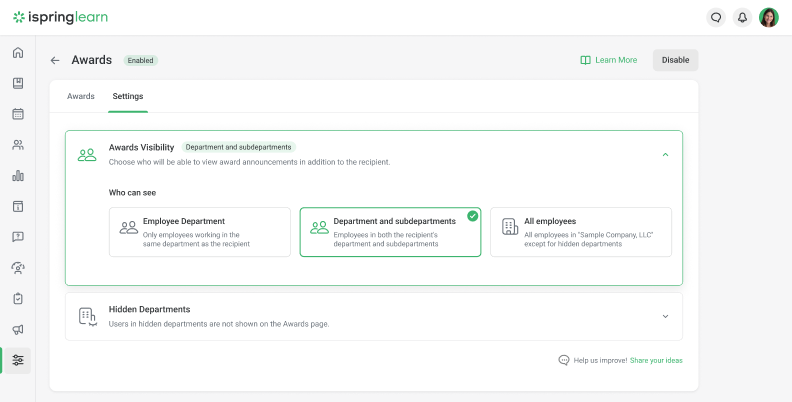
Once you set the visibility options, users will only see the rewards they have access to in the new User Portal section.
-1739358423.png)
If you click on an award’s icon, you’ll see all employees who have received it.
-1739358440.png)
With this feature, you have an additional way to foster motivation, boost employee engagement, and improve performance.
Customizable User Portal Navigation Menu
Now, you can customize the User Portal to highlight what matters most. Administrators can set a custom homepage, rearrange key sections, and declutter the interface to fit learners’ needs.
If you use iSpring Learn for training, My Courses can be the starting point. Or, if it serves as a corporate portal, you can set News as the homepage. This way, learners will always have access to the most relevant modules. But don’t worry about losing the other modules — they’ll be in the three-dot menu:
-1739358463.png)
How to customize the User Portal homepage
To customize the navigation menu in iSpring Learn, go to Branding in Settings and scroll down to the Navigation Menu in the User Portal section.
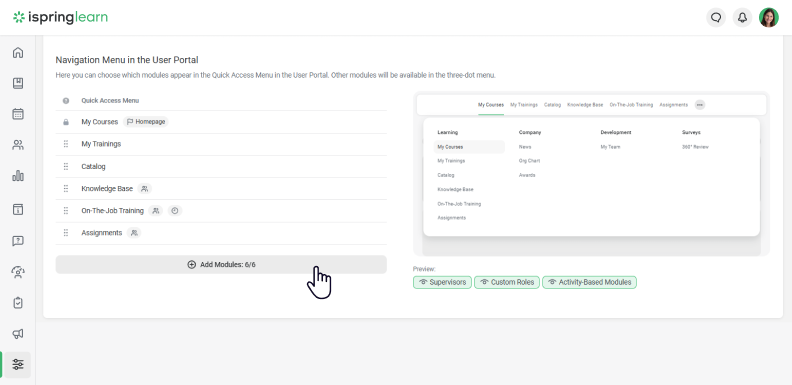
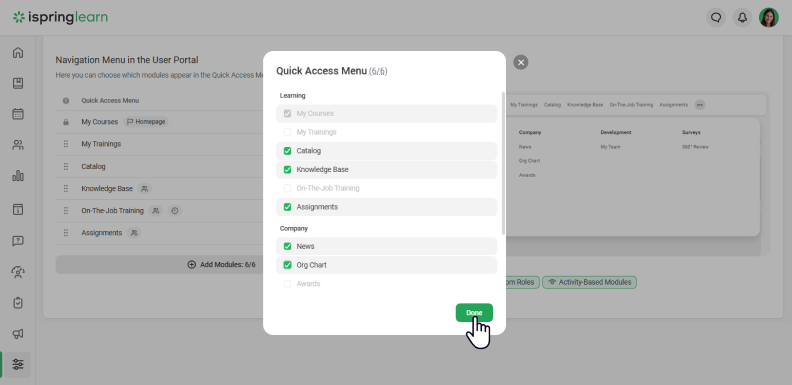
Click on Add Modules and select the most relevant ones for your learners. You can add up to 6 modules to the Quick Access menu.
Next, select which module will be the Homepage.
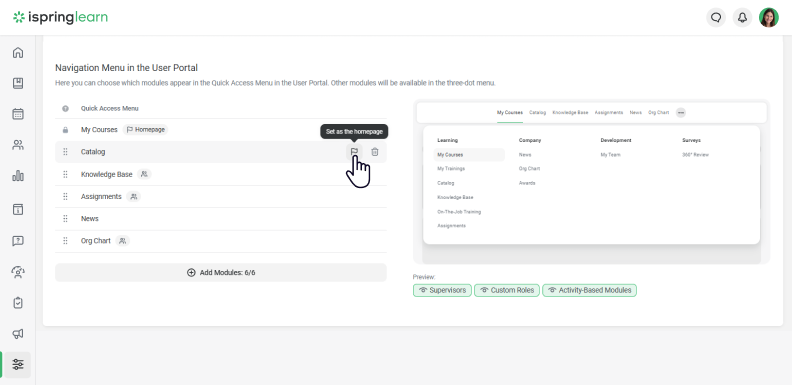
When setting up the menu, you can preview it for different roles by selecting the relevant tag, like Supervisors or Custom Roles.
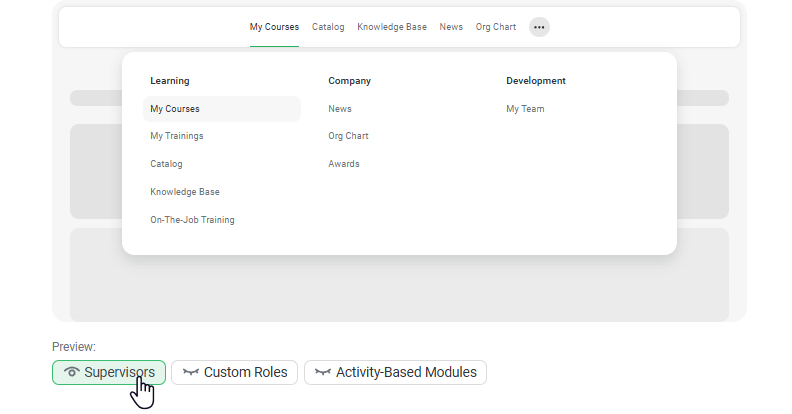
Once everything is set, click on Save. All new modules and your settings will be applied automatically.
Now you’re all caught up! These updates are ready to improve your iSpring Learn experience — take a look and see what’s new! If you’re not using iSpring Learn yet, book a free demo to discover how it can simplify training and boost learner engagement.
