Custom Slideshow in PowerPoint
Usually used within a big presentation, a custom slideshow is a sequence of slides that expresses some exact idea or represents a particular subtopic. Custom slideshows can run by clicking on a hyperlink during presentation playback or be launched within the PowerPoint’s Slide Showtab, where you see the list of your custom shows.
How to create a Custom Slideshow
To create a Custom Slideshow in PowerPoint 2013
- Create or open a presentation that has more than one slide.
- Select the SLIDE SHOW tab.
- Click Custom Slide Show to expand the menu, and then select Custom Shows.

Note: if you click on a show’s name above, this custom show will start playing back in PowerPoint. - Click New to create a custom Show or Edit an existing one.

- Give a distinctive name to your show, select the appropriate slides and click the Add button. Use the arrows on the right if you want to change the slide order in your custom show. Then click OK to apply changes.

How to play a custom slideshow
To make a custom slideshow start on a hyperlink
Right click on the text or shape and select Hyperlink.

Select Place in This Document on the left-hand menu.
Scroll down the list until you see Custom Shows and select the one you need (Custom Shows: Birds).
Click OK to apply.

Tip: if you want to take the user back to the hyperlink menu after the custom show is ended, check Show and return in the Edit Hyperlink window. If you don’t check this option, the playback will end with the end of your custom show.
Custom Show Types
Let’s apply these ideas to real situations. Below, you can see two custom show types that can improve your presentation.

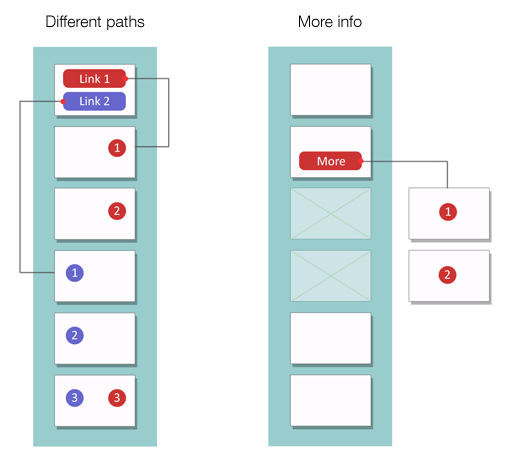
Type: Different Paths

A single presentation can be repurposed for different groups of people and provide each of them with the most suitable scenario.
The diagram above shows six slides that can be viewed in a row. However, the first slide contains a menu that lets you choose a particular path through the presentation.
If a viewer selects Link 1, the “red” sequence will be shown (Slides 2, 3 and 6).
In case the Link 2 is selected, the “blue” sequence will come up (Slides 4, 5 and 6).
Note: Custom slideshows may share some slides in common, like Slide 6 in this example.
Type: More Info

If you want to add some explanatory sections (branches) to your presentation that may be opened only by clicking on a button, you can do it by applying a combination of hidden slides and custom slideshows.
In this diagram above, you can see a presentation that consists of six slides, but Slides 3 and 4 are hidden. These slides are grouped in a custom slideshow that can be activated by clicking on the More button.
To create a hidden custom slideshow
Select one or more slides in the thumbnail column on the left.
Right click on the selection and click Hide Slide.

Go to SLIDE SHOW > Custom Slide Show and create a show from the hidden slides so you can use this additional descriptive branch.
Then assign a hidden custom show to a link
- Select an object (text, shape, picture, etc.) to assign a hyperlink.
Right click and select Hyperlink.
Select Place in This Document, then select a custom show that we have just created.
Important: Check the Show and return option.
Click OK.

Make a custom slideshow
Now that you can create custom shows and assign them to hyperlinks, let’s do a little practice. Download the sample presentation below and add custom slideshows to it.
If you liked the article, please let us know by clicking the Share button.


