How to Embed a YouTube Video in PowerPoint

One sure and simple way to enhance a Microsoft PowerPoint presentation and boost audience engagement is to embed a video from YouTube. This website is chock-full of educational and entertaining videos that can add a dynamic element to your content, and you can add a YouTube video to a PowerPoint slide show in just a few clicks. Whether you want to use your own footage or “borrow” it from someone else’s channel, these five step-by-step guides on how to insert YouTube videos into PowerPoint slides will help you out.
1. How to Embed a YouTube Video in PowerPoint as an Online Video
Starting from version 2010, Microsoft PowerPoint includes a built-in tool for inserting videos from YouTube into slides. Follow these 5 steps to embed a YouTube video in a PowerPoint slide show:
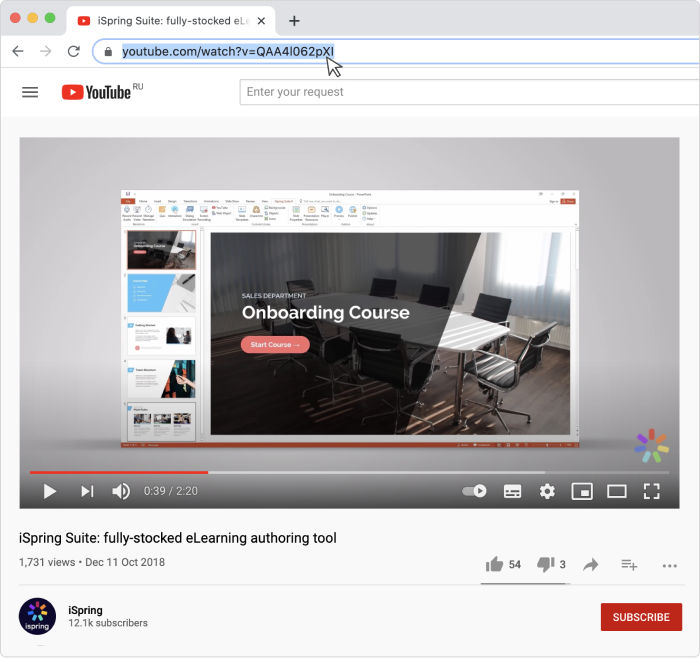
- Go to YouTube and find the video you want to embed in your presentation. Copy the video URL from the address bar.

- Open your presentation and select the slide in which you would like to place the YouTube video, select the Insert tab → Video, and select Online Video.

- Paste the video URL in the pop-up window.
 Using this field in the opened window, you can also search for a YouTube video directly. Click on the magnifying glass or press Enter on your keyboard to perform a search.

- Click on the thumbnail of the web video and click the Insert tab.
- Now you can adjust the online video’s size, in the same way as with any other slide object.

Pros
- Quick and easy
Cons
- Requires that viewers have a stable internet access
- Playback is not customizable
- Can’t be done in PPT version 2007 and earlier
2. How to Add a YouTube Video to PowerPoint Presentations Using an Embed Code
A more advanced way to embed YouTube videos in PowerPoint is to use the embed code you can get via the Share button. This method allows you to customize the YouTube video’s attributes by using the YouTube API parameters.
Here’s a brief guide on how to embed a YouTube video into your PowerPoint slide:
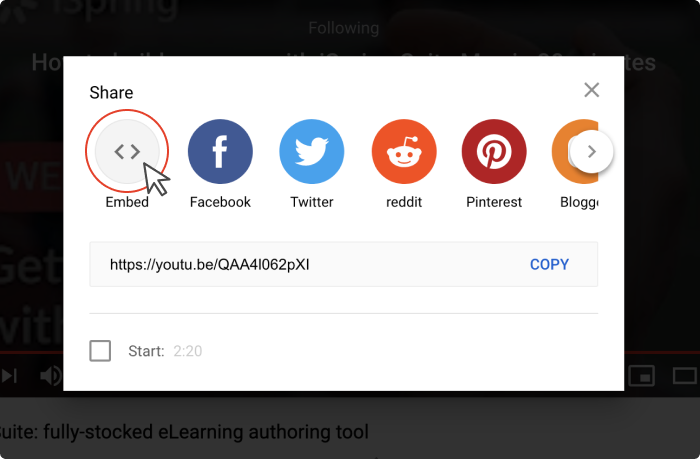
- Go to YouTube and find the web video you want to add. Click the Share button, and then select Embed to generate an HTML code.
 Copy the entire HTML code.

- Open Microsoft PowerPoint and select the slide in your presentation. Click the Insert tab and choose Video → Online Video again.

- Paste Embed Code into the From a Video Embed Code field.

- Click on the Insert button or Enter.
Note: Before you add the YouTube video to PowerPoint, you can add some parameters to the code to make the video play the way you need it to. For example, you can let the video start playing automatically after a user opens the Microsoft PowerPoint slide it has been placed in, set it to start by clicking the Play button, or you can specify how many seconds from the start the video will begin and when it will end.
You can read about all the available YouTube API parameters here.
Pros
- More control over the online video’s playback and appearance with the help of parameters
Cons
- More time consuming than inserting a link
- An online connection is required
3. How to Insert YouTube Videos in PowerPoint to Play Without Internet Access
While all of the above tips require viewers to have an internet connection, you can make your presentation internet independent by making a screen capture of the YouTube video. To do that, use the built-in screencasting tool in Microsoft PowerPoint. This option is available in PowerPoint 2013 and later versions.
Here is how to embed a YouTube video into PowerPoint as a Screencast:
- Open PowerPoint and select the slide you want to insert the screen recording into, click on the Insert tab, and select Screen Recording.

- Open the YouTube video you want to add and click Select Area on the control menu. You’ll see a cross-haired cursor. By clicking on it and dragging it, you can select the area of the screen that you want to record.
Note: It automatically records the audio and the mouse pointer. To turn off these options, deselect Audio and Record Pointer on the control dock. 
- Click Record. Click Pause when you need to stop the recording temporarily or Stop to end it.

- When you’ve finished, save your presentation with a video: File tab > Save. The recording is now embedded in the selected PowerPoint slide.
Pros
- When you embed a video from YouTube via embed code, it can be played offline
Cons
- The quality of the captured video content is lower than that of the original version
- Requires more time than other techniques (the time required depends on the duration of the video you capture)
- May violate author’s rights
4. How to Put a YouTube Video in PowerPoint via iSpring Suite
Now that you know how to embed a video in PowerPoint with the tool’s built-in functionality, let’s look at a less obvious way that might come in very handy in certain cases. This method assumes that you need to add YouTube video to PowerPoint slides and then turn your PPT deck to HTML5 so users can open and view them in a browser or convert the entire PowerPoint slide show to video format. This is a perfect way to go if you want to insert a YouTube video into a PowerPoint document and then share your presentation online and protect it from plagiarism and unfair use. You can do this easily with the help of iSpring Suite, one of the most robust PowerPoint add-ins.
iSpring Suite
Fully-stocked eLearning authoring tool for PowerPoint. No training required to start!
Here are the simple steps on how to add a YouTube video to PowerPoint deck before publishing it to the Web:
- Download iSpring Suite and install it on your computer.
- When your PowerPoint presentation opens, go to the iSpring Suite tab. (Once the software is installed, the new tab of this add-in automatically appears in the PowerPoint ribbon).

- Select a presentation slide you want to have a video in and click on YouTube.

- Insert the link to the video. After that, you can preview a video and set a delay after which the video will appear on the slide.

- Click on OK to insert a video into PowerPoint.
- To see how your PowerPoint presentation looks in a browser, click on the Preview button.
- If it looks the way you want it to, click on Publish.

- Select My computer on the drop-down menu on the left pane to publish your presentation to the Web. You can choose the HTML5 or MP4 video format. Or, you can upload your converted presentation to YouTube in an .mp4 format, with all effects preserved.

Pros
- Sharing options: slides can be shared online so learners can see them in a browser from any device (PC, laptop, tablet, or smartphone) and on any OS (Windows, Mac, etc.)
- Presentation can’t be edited by external sources after conversion, so copyrights will be protected
- Slides are safe behind a wall of protections – watermarks, passwords, and time and domain restrictions
Cons
- The PowerPoint presentation can’t be opened in offline mode
- Requires downloading third-party software
More than just a converter!
With iSpring Suite, you can not only insert a YouTube video into PowerPoint and convert your presentation to an online format, but you can also create versatile eLearning content. This is a top-rated authoring toolkit that allows you to create engaging online courses, quizzes, video tutorials, role-plays, and eLearning interactions. No experience or tech skills are required.
Start your free iSpring Suite trial now →
5. How to Edit a YouTube Video in PowerPoint
What if you want to adjust a video for your presentation — for example, embed only a part of a YouTube video into your PowerPoint slide show? If that is the case, you can easily do that by setting the start and/or end position of the playback.
Here’s what you need to do:
1. Insert a video into your PowerPoint presentation as described above.
2. Click on the Playback tab at the top.

3. Select Trim video from the dropdown menu.

4. Trim your video using the sliders or by adjusting the start and end time of the clip. Your video will begin and end with the video frames tied to the timecode.
That’s it! You have inserted a desired part of the video into your PowerPoint presentation.
Note: Another way to trim a video in a PowerPoint slide is to right-click on the video and select the Trim option from the menu.
Moreover, you can use the options in the Playback tab to further edit your video. For example, you can add fades, adjust volume, loop the video, insert closed captions or subtitles, and more.

Here, you can also adjust whether the video will play automatically or by click.

Using these built-in Microsoft PowerPoint options will help you customize the video without any additional tools.
How to Choose the Best Way to Embed YouTube Videos in PowerPoint Presentation
To simplify matters, take a look at this chart. It compares the pros and cons of all described methods in one place, so you can choose the way to embed a YouTube video in PowerPoint that’s most suitable for your needs.
| Pros | Cons | |
| 1. Insert as an online video |
|
|
| 2. Use an embed code |
|
|
| 3. Screen capture a YouTube video |
|
|
| 4. Use iSpring Suite |
|
|
FAQ on How to Embed YouTube Videos in PowerPoint
1. What video formats are supported in PowerPoint?
Here are the video file formats you can add to your presentations.
- Windows Video (.asf)*
- Windows Video (.avi)*
- MP4 Video (.mp4, .m4v, .mov)
- Movie (.mpg, .mpeg)
- Windows Media Video (.wmv)
*Some of these files may need additional codecs to play properly.
2. How do you embed a video from YouTube in PowerPoint slides and have them play automatically?
This method works for videos added from your computer or OneDrive cloud storage. Once you’ve added a video in PowerPoint, you can control how it will play: automatically, when clicked, or in the click sequence.
The default option is “In Click Sequence”, which means the video will play when you click on the slide the video is embedded into. You can also choose to set video playback to “On Click” to get it to play once you hit the Play button on the video. Or you can opt for it to play automatically when the slide with the video appears on the screen.
To set this up, go to the Playback tab of the PPT ribbon. It appears when you select the video on a presentation slide.

Then click the drop-down menu next to Start and choose Automatically if you want the video to begin as soon as you open the slide.

You can also customize videos added via embed code by making adjustments to the code.
3. Why can’t I embed YouTube videos in my PowerPoint Presentation?
There may be different reasons why you can’t embed a video from YouTube in PowerPoint. To resolve this issue, check out this article by Microsoft. If you can embed YouTube videos in PowerPoint but they won’t play even when you click the Play button, the issue might be Internet Explorer. According to Microsoft, Internet Explorer 11 is required for videos embedded in PPT slides to play properly. Since the browser was discontinued in 2022, you might need to allow the Internet Explorer compatibility mode in Microsoft Edge on your computer with Windows OS.
4. PowerPoint can’t insert a video from the selected file. How can I fix it?
There could be several reasons why PPT isn’t allowing you to insert a video from the selected file. The first possible issue is a video format compatibility — PPT may not support the format of the video you are trying to insert. One more reason is codec issues. Codecs are software used to compress or decompress a video or audio file. If your system doesn’t have the correct codec, the file will not play. Check out this article by Microsoft to find out details.
5. Can I download YouTube videos?
There are certain limitations and legal aspects that you should be aware of. YouTube’s Terms of Service specify that videos are intended for streaming, not for downloading, and unauthorized downloading of an online video from the platform can violate copyright laws.
There are also third-party services — free YouTube downloader apps that allow you to download videos from YouTube. They can seem a convenient solution if you want to add a YouTube video to PowerPoint and customize it according to your needs. However, using such services might be against YouTube’s policies, potentially leading to the suspension of your account.
YouTube offers an official way to access videos through its own app for offline viewing, which is YouTube Premium, a subscription-based service. This is legal and permitted by YouTube’s policies.
Additionally, if you are the owner of the content or have explicit permission from the owner, you can download the video directly from YouTube’s site. If this is the casepreferable option since users frequently complain about annoying ads when authors , downloading the video is a put a YouTube video in PowerPoint slides as online videos.
Conclusion
There are several ways to add YouTube videos to PowerPoint. Depending on the method you use, embedding YouTube videos may require different amounts of time and have various playback options. If you want to customize video playback, the best option will be to embed video content in your slide using a video URL or an embed code. If your task is capturing a video and inserting it into a PowerPoint presentation that will be played offline, record a screencast. And, finally, in case you want to share your presentation online and are concerned with its security, use iSpring Suite.
Useful Resources on PowerPoint
We hope you found our step-by-step guide on how to embed a YouTube video in PowerPoint helpful. Are you a PowerPoint lover? If so, here are some other helpful articles that will provide all the tips on how to get the most out of PowerPoint and grab your audience’s attention:
- How to Share a PowerPoint Presentation Online
- How to Protect PowerPoint Presentations
- How to Add Narration to a PowerPoint Presentation
- How to Convert PowerPoint Presentation to an eLearning Module
- How to Remove the Background From a Picture in PowerPoint


