How to Convert PowerPoint to MP4 Video on Windows and macOS

Let’s say you want to share a PowerPoint presentation that includes your narration. What should you do?
Turn the PowerPoint presentation into an MP4 video! But is it possible to convert a PowerPoint presentation into a video? Yes, you can convert PPT or PPTX to MP4 pretty easily, and you only need MS PowerPoint (version 2010 or later). In this article, you’ll learn how to create a short movie out of your PPT slideshow step by step – whether you’re a Windows or macOS user.
This approach is perfect for those who have simple presentations without many effects, animations, and complex timings. Otherwise, you should use third-party video converters that will preserve your effects better.
Let’s see how you can convert your PowerPoint presentation to MP4 or MOV video using the default version of MS PowerPoint.
How to convert your PowerPoint presentation into a video:
How to Convert a PowerPoint Presentation to an MP4 Video on Windows
1. Open your presentation
Open the PowerPoint file you want to convert. If it’s already open, save a backup copy of your latest version before the conversion to ensure that your video includes all recent changes.
2. Export it to video format
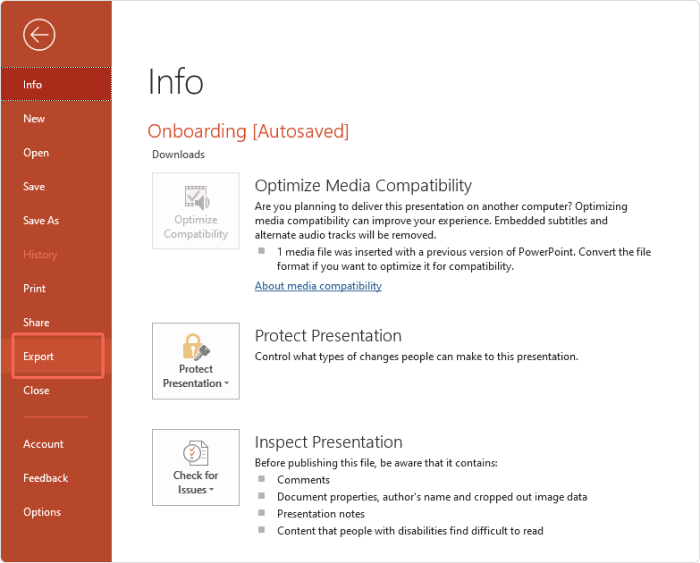
Select File and then click Export if you use PowerPoint 2013 and above, or Save & Send if you’re using PowerPoint 2010.
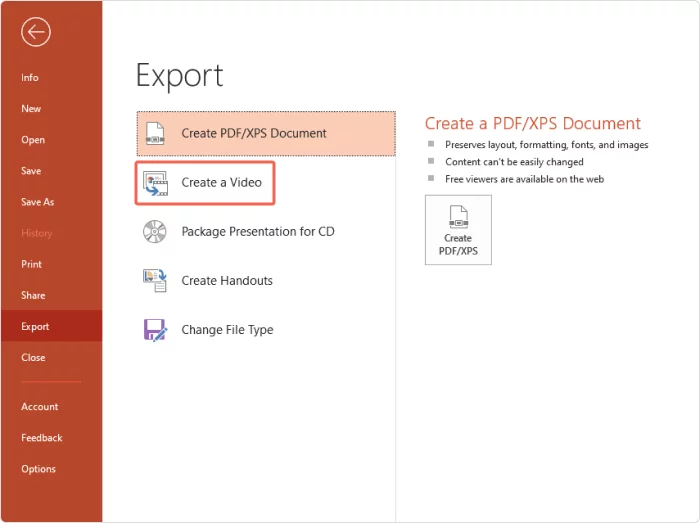
Click on Create a Video.
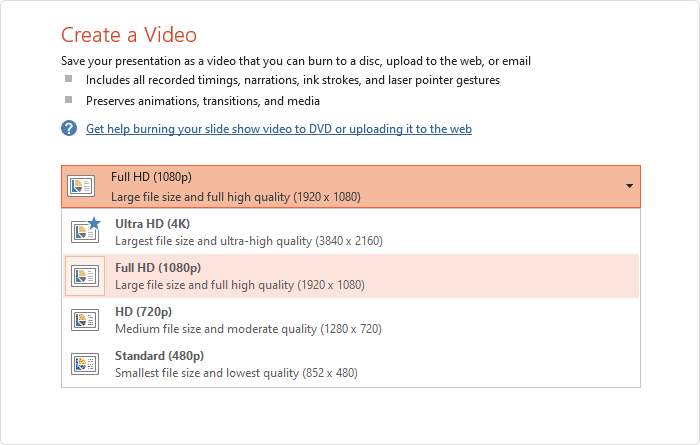
3. Customize the video settings
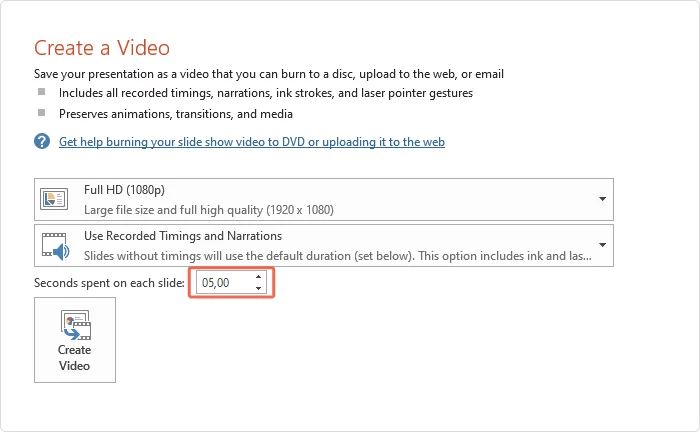
Select your video quality. When you convert PowerPoint files, balancing quality and file size is key. You don’t really need the highest screen resolution unless you want to show the video on a big screen — it will only take up space in your computer’s storage. Full HD is more than sufficient for most cases, including if you want to upload your video to YouTube.
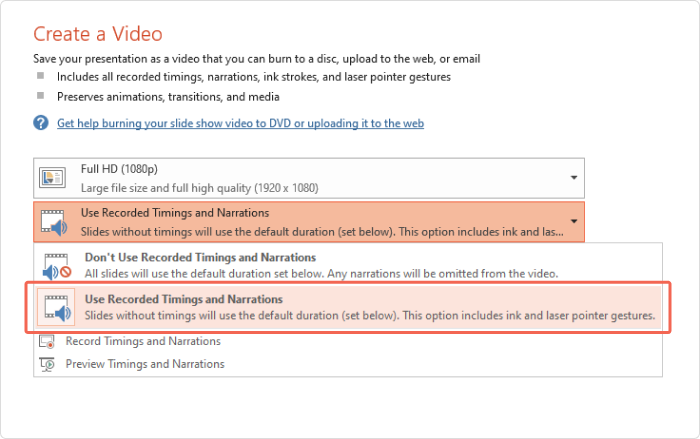
If you have timings or narrations and want to preserve them in your video presentation, click on Use Recorded Timings and Narrations.
If you don’t have narrations yet but need them in your final MP4 file, you can record them at this stage by selecting Record Timings and Narrations.
4. Adjust slide duration
If you don’t have custom timing for each of your PPT slides, set the amount of time you want each one to display. You can increase or decrease the time using the up or down arrow next to Seconds spent on each slide.
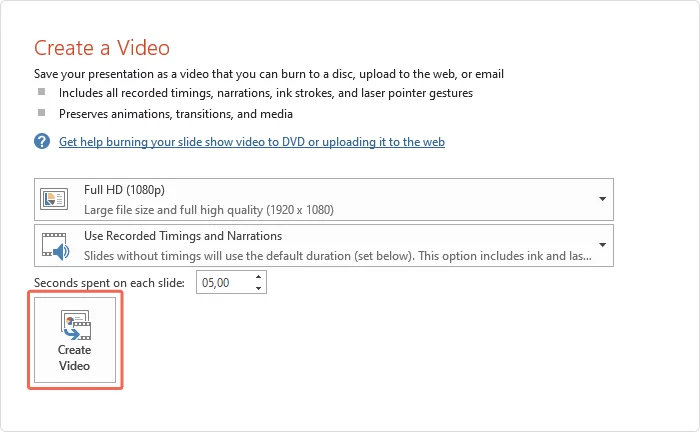
Click on Create Video.
5. Save the video file
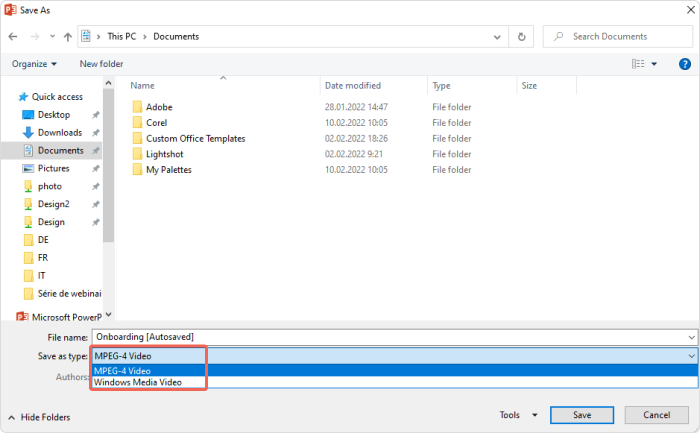
Now, select a location where you would like to save the PPT as a video and the necessary video format.
Once the video creation process is finished, it’s done! Now you know how to convert PPTX and PPT to MP4 video.
Or save it as a PowerPoint Show
PowerPoint offers another way to save your presentation as a video-like experience by saving it as a PowerPoint Show (.ppsx format). This method is useful if you want to distribute your presentation as a standalone video file that automatically opens in slideshow mode.
Here’s how to turn your presentation into a slideshow:
- Open the PowerPoint file you want to convert into a slideshow. Ensure all changes are saved.
- Click on File to enter the file menu, then select Save As (or Save a Copy in some versions of PowerPoint).
- In the Save As dialog box, navigate to the location where you want to save the video presentation.
- Under the Save as type dropdown menu, select PowerPoint Show (*.ppsx).
- Enter your file name and click Save.
And that’s it! Now you know how to convert a PPT presentation to an MP4 video.
Your presentation will now be saved as a PowerPoint Show file. When opened, it will launch directly into slideshow mode, providing a seamless playback experience similar to a video.
While this is not an MP4 file, it allows users to view the PPT slides without needing to manually start the slideshow.
How to Convert a PPT Presentation to an MP4 Video on macOS
1. Open your presentation
Open the PowerPoint file you want to convert. If it’s already open, save a backup copy of your latest version before the conversion to ensure that your video includes all recent changes.
2. Export to video format
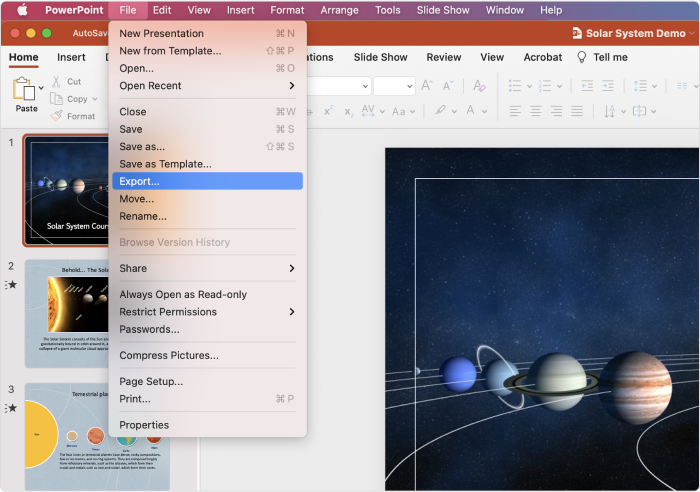
Select File and then click on Export.
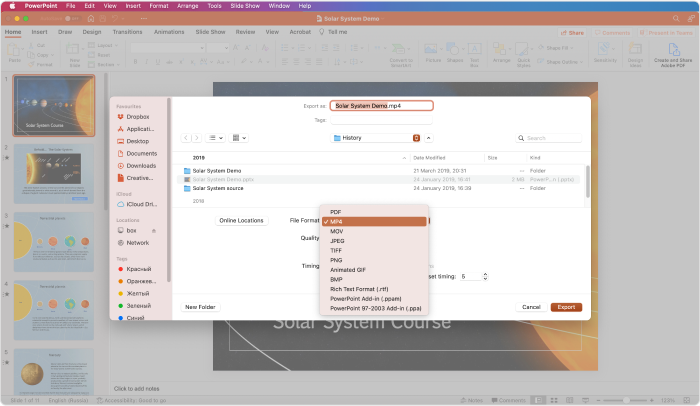
3. Adjust quality and timings
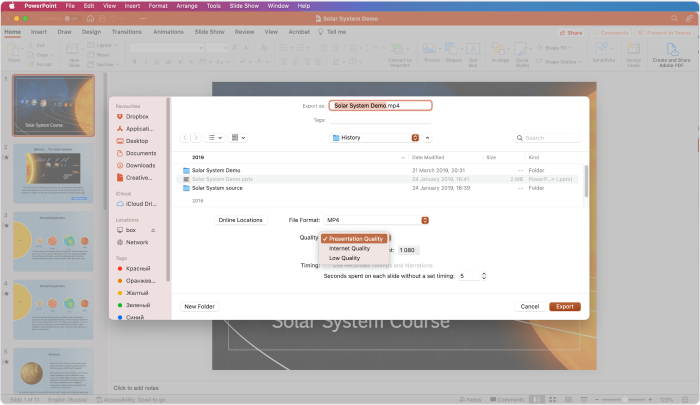
Next, select the quality of your video on the Quality menu. You don’t need the highest screen resolution unless you want to show the video on a big screen — it will only take up more space in your computer.
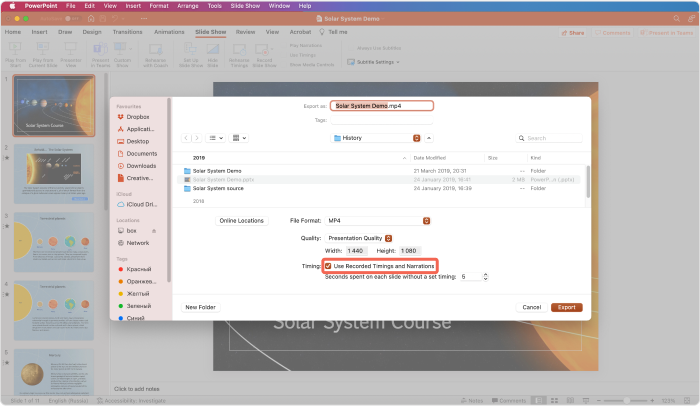
If you have timings or narrations and want to preserve them in your video presentation, click on Use Recorded Timings and Narrations.
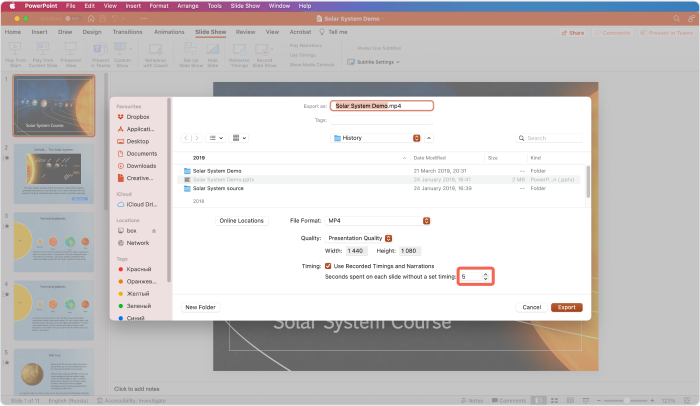
If you don’t have custom timings for each of your PPT slides, set the amount of time you want each of them to display. You can increase or decrease the time using the up or down arrow next to Seconds spent on each slide without a set timing.
4. Export the file
Click on Export.
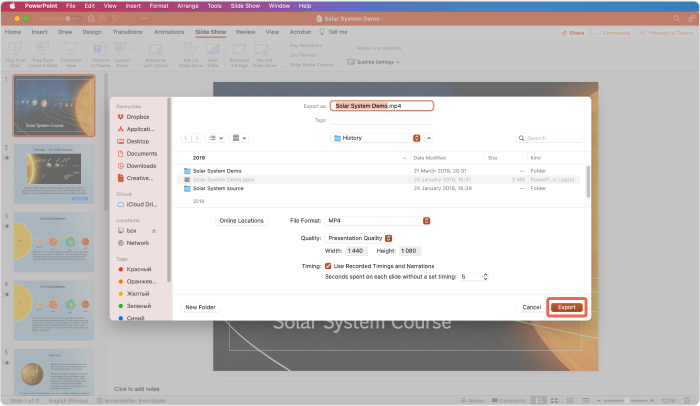
And that’s it! These are the steps you need to take to convert PPT to MP4 on macOS. Just wait for the conversion process to finish, and your MP4 presentation is ready. You now know how to save PPT as video!
Video Quality Options: A Comparison
Now that you know how to convert PPT to MP4 and how to convert PPTX to MP4, you need to determine which video quality will match your needs. The table below compares the available options, their resolutions, and the best use cases for displaying your final video.
| Video Options | Video Resolution | For Displaying On |
| Ultra HD (4K) | 3840 x 2160 | Large screens, professional PPT slides, or conference rooms. |
| Full HD (1080p) | 1920 x 1080 | Most use cases, including YouTube uploads and general viewing on laptops or TVs. |
| HD (720p) | 1280 x 720 | Smaller screens like tablets or for quick shares on social media. |
| Standard (480p) | 852 x 480 | Mobile devices or when the file size needs to be minimal. |
What to Do with Your Video after Conversion?
Now that you know how to convert PowerPoint presentation to video, the next step is to learn how to share it with your audience. Here are some helpful guides to explore your options for sharing:
- Email your video presentation. If you want to send your video via email, check out this guide on how to email a PowerPoint presentation or eLearning course. It includes tips for managing file size and ensuring smooth delivery.
- Share your video online. For those who want to share their PPT slides in video format on websites, blogs, or social media, read this article on how to share a PowerPoint presentation online. It provides step-by-step instructions for various platforms, including cloud storage and embedding options.
Preserve Quality, Sounds, and Effects with a PowerPoint to MP4 Converter
PowerPoint is more than sufficient for simple presentations. However, we often see that, in more complex cases, the timings of slide transitions are inaccurate after you convert PowerPoint presentations to video.
If you want to preserve all of your PPT effects, transitions, and animations intact in your final video, use iSpring Converter Pro. Our PPT to MP4 converter was designed specifically for this sort of task and comes with a fully functioning 14-day free trial version.
FAQ
What video formats are supported?
There are several PowerPoint video format options: MPEG-4 Video (MP4), Windows Media Video (WMV) for Windows users, and MOV — for macOS users. If you need a different file format, you can use another PowerPoint to video converter software.
Why convert PPT to MP4 videos?
People convert PowerPoint to MP4 for three main reasons:
- They want to share their PPT slides on social media, blogs, or video sharing sites.
- They want to protect their PowerPoint file from being modified and repackaged by someone else.
- They would like their PPT slides to display flawlessly on devices that support video, like smart TVs, tablets, and smartphones.
Will animations and transitions be preserved in the converted video?
It depends on the conversion method you use. MS PowerPoint preserves some simple effects, but in complex cases, animations can be distorted or lost. A third-party video to PPT converter, like iSpring Converter Pro, will retain animations and transitions, while others may not. So, before you convert PPT to MP4, check if your tool supports the effects in your slides.
Are there any recommended settings for optimizing video quality during conversion?
We advise selecting a resolution that’s based on your target platform (e.g., 1080p for YouTube). Additionally, consider adjusting settings like frame rate and bitrate for optimal quality.
How long does the export from PowerPoint to MP4 (video) take?
The time it takes to convert PPT to MP4 depends on several factors, including the length of the presentation, the number of animations and transitions, and the video quality you choose. For most presentations, the process can take anywhere from a few seconds to several minutes. Check the conversion status bar for an estimated time.
What parts of a presentation won’t be included in a video?
Certain elements, like embedded media files, external links, and some advanced animations or transitions, may not be preserved when you convert PPT to MP4. Additionally, any interactive features such as triggers or hyperlinks will not function in the MP4 format.


