How to Make a Timeline in PowerPoint + Template

Timelines are visual elements used in presentations to illustrate the progress of events in a chronological — or simply logical — order. They often come in handy, but building a timeline in PowerPoint can be a tedious task without the right tools and skills.
In this article, I’ll show how to create a timeline in PowerPoint in two different ways. Check them out and choose the one that works best for you.
Ready to start? Jump to one of the following sections.
Choose from the two methods:
Need to learn more about timelines first? Here’s a brief primer.
What Is a Timeline?
A timeline is a visual representation of a list of events, milestones, or stages of a process represented in the order in which they happen.
These are usually arranged along a horizontal or vertical line and are complemented with additional information, such as dates and descriptions.
For example, you can illustrate how historical events unfolded or arrange project milestones to visualize planning. A typical timeline looks like a horizontal line, with segments of time progressing from left to right.
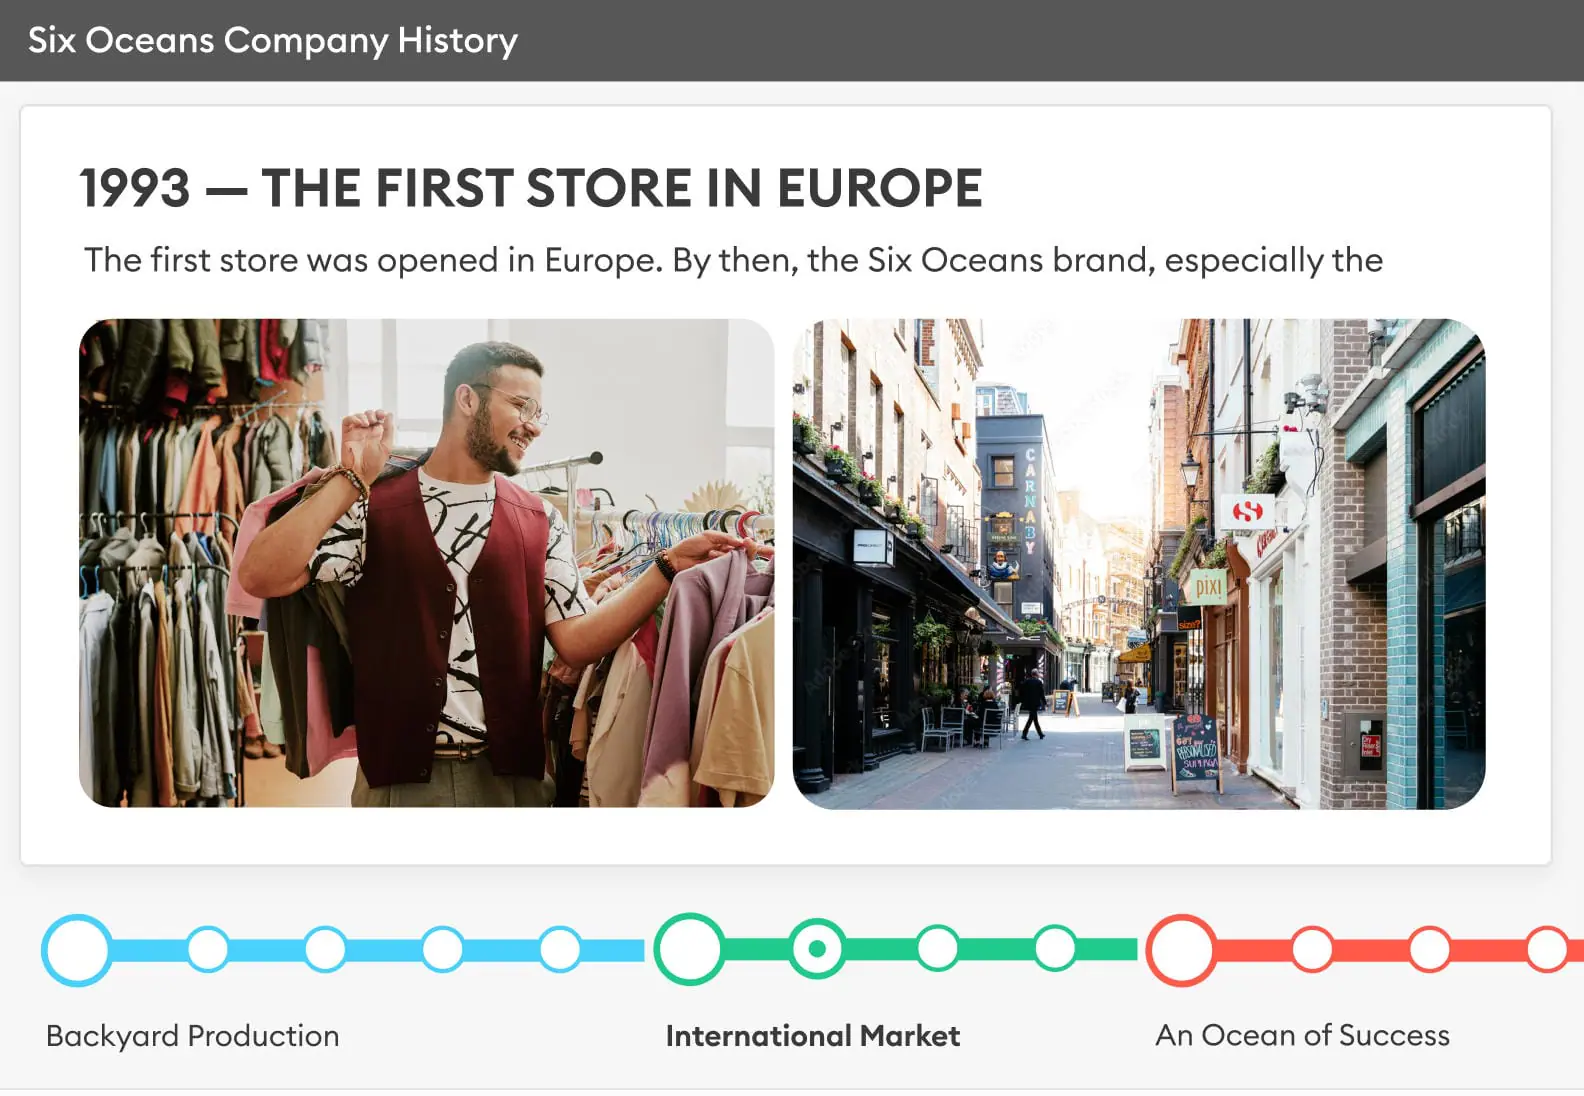
The most popular timeline types include the following:
- Horizontal timeline. Goes from left to right and is typically used to arrange events in a chronological order or visualize a project plan.
- Vertical timeline. Usually goes from bottom up and can be used to measure gains, such as profits.
- Roadmap timeline. Often looks like a winding line with highs and lows. Very common in business planning.
- Gantt chart timeline. Typically looks much like a spreadsheet and is used in business planning, especially to illustrate project timelines.
- Interactive timeline. This type includes links, animations, and other interactive elements that make it more convenient, informative, and engaging.
Some of these and other timelines can be created using PowerPoint alone. For others, you will need additional PowerPoint timeline templates or add-ins.
What You’ll Need to Create a Timeline
Before we begin, here are the things you’ll need to put together a good-looking and truly informative PowerPoint timeline.
| PowerPoint with SmartArt | PowerPoint with an add-in | |
|---|---|---|
| Tools/prerequisites | Microsoft PowerPoint | Microsoft PowerPoint + free trial of iSpring Suite |
| Experience level needed | Intermediate | Beginner |
| Estimated time to complete | 30 minutes to 1 hour | 5 minutes |
As you see, you can create a timeline in PowerPoint much faster with an add-in. One way is to use iSpring Suite — a powerful tool that helps you create professional-looking timelines in minutes. Moreover, it’s beginner-friendly, so you won’t spend hours with a learning curve.

In the following sections, you’ll learn how to create a timeline directly in Microsoft PowerPoint, both with and without an add-in. Plus, we’ll explain how to insert a timeline created with another app like Microsoft Word, Canva, or Adobe Photoshop.
How to Make a Timeline in PowerPoint with SmartArt
PowerPoint has a native tool, SmartArt, that allows you to communicate information with graphics instead of just using text. This is an effective way to let a viewer grasp temporal relationships quickly.
Here’s a step-by-step guide on how to build a timeline in PPT using a SmartArt graphic. Let’s create a timeline for a 5-step manual of effective new hire onboarding.
1. Create a timeline chart in PowerPoint
- Create a new PowerPoint presentation or open an existing one. You can apply a custom Theme that reflects your style right away via the Design tab on the PowerPoint ribbon.
- Select the PowerPoint slide you’re going to place your timeline on, go to the Insert tab, and click on the SmartArt icon.
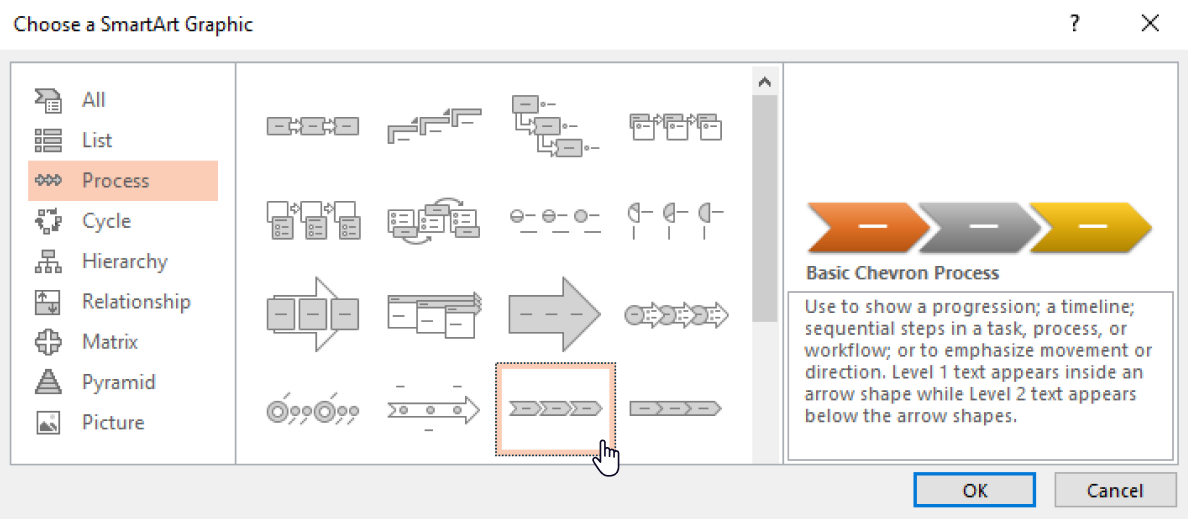
- PPT offers a selection of timelines, such as Basic Timeline, Circle Accent Timeline, and more (depending on the version). But you can also adapt graphics from the Process menu to work as timelines.Let’s select Process on the left and pick the timeline design you need in the central pane. To select the appropriate design, read the descriptions. Then click on OK.
In this case, we’ll choose the Basic Chevron Process SmartArt graphic.
- This type of timeline will include three elements by default. If you need to add more sections to your timeline, click on Add Shape on the top panel.
2. Add the text
Now, let’s add all the data to your timeline.
- Start by giving names to your timeline elements according to your topic. In our case, these will be the five essential steps of an onboarding process.
You can break down anything else in the same manner — for example, create milestones within a project timeline. - Fill in additional text under each section. You can arrange it using bullet points for more clarity and readability.
To fill in the text of your timeline more easily, use the Text Pane. Just click on your timeline, and it will appear automatically.
3. Customize your timeline
Once you add all the necessary details, customize your chart. Set the fonts, resize elements, and change the colors of shapes by going to the FORMAT tab > Shape Fill. You can also do this using the SmartArt Design tab, which appears when you click on the timeline.

Awesome! Your timeline already looks pretty good on the PowerPoint slide. To improve it further, let’s make it interactive by adding some links and animations.
Pro tip:
As you can see, customizing the look of your SmartArt graphic is not difficult, but is quite time-consuming, especially with longer timelines. The good news is, you can skip a lot of the manual work by using one of the ready-made PowerPoint timeline templates.
Microsoft offers an extensive selection of templates, including a number of project timeline templates, product roadmap timeline templates, and history timeline templates. To pick a timeline template in PowerPoint, choose it in the main menu when creating a new PowerPoint presentation. However, keep in mind that native PPT templates are not always easy to customize, especially if you need to make updates or add interactions.
How to Make Your PowerPoint Timeline Interactive
PowerPoint allows you to create interactive timelines without additional tools. However, you might have to break your SmartArt graphic into shapes to prepare it for conversion, fine-tune links, and set custom animations. So we recommend that you first make a backup copy of your original SmartArt, in case you need to change it or create another similar timeline. Here’s how to do that.
- To copy your SmartArt, manually drag it by its border while holding the Ctrl key on your keyboard. Drag and drop the copy of the original Smart Art outside the slide.
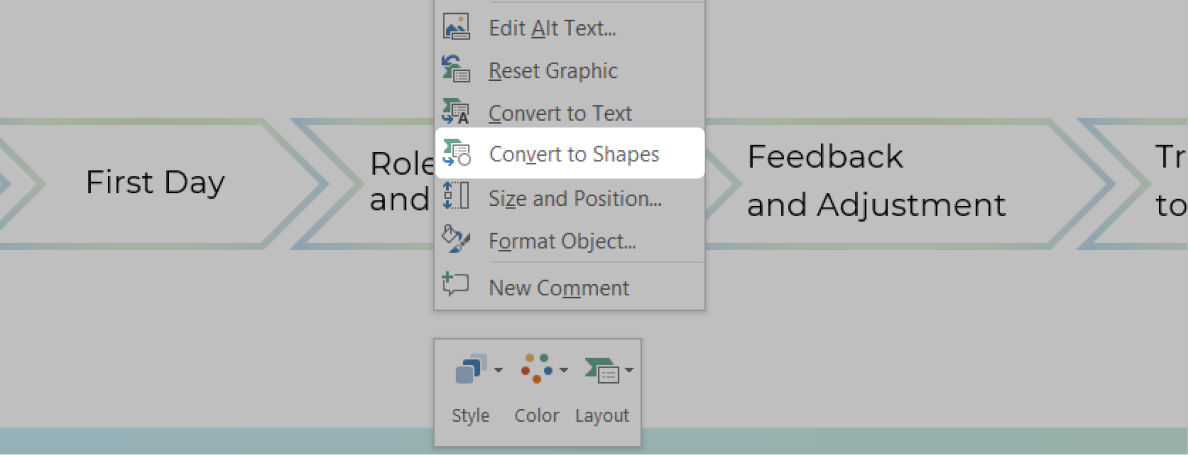
- Then right-click on the border of the SmartArt that’s on the slide and select Convert to Shapes from the dropdown menu.
- Right-click on the border of this shape and go Group > Ungroup.
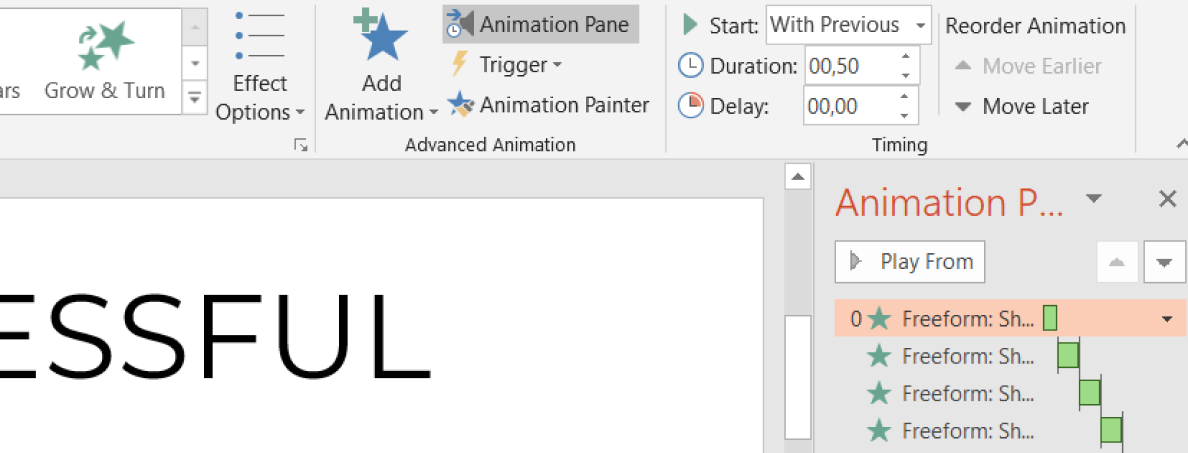
- Select each form individually and apply animation. Let’s choose the Fade animation in this case. Set Start: With Previous for the first animation and After Previous for all the rest. Set effect options From Left for the horizontal timeline bar and From Top for the bullets.
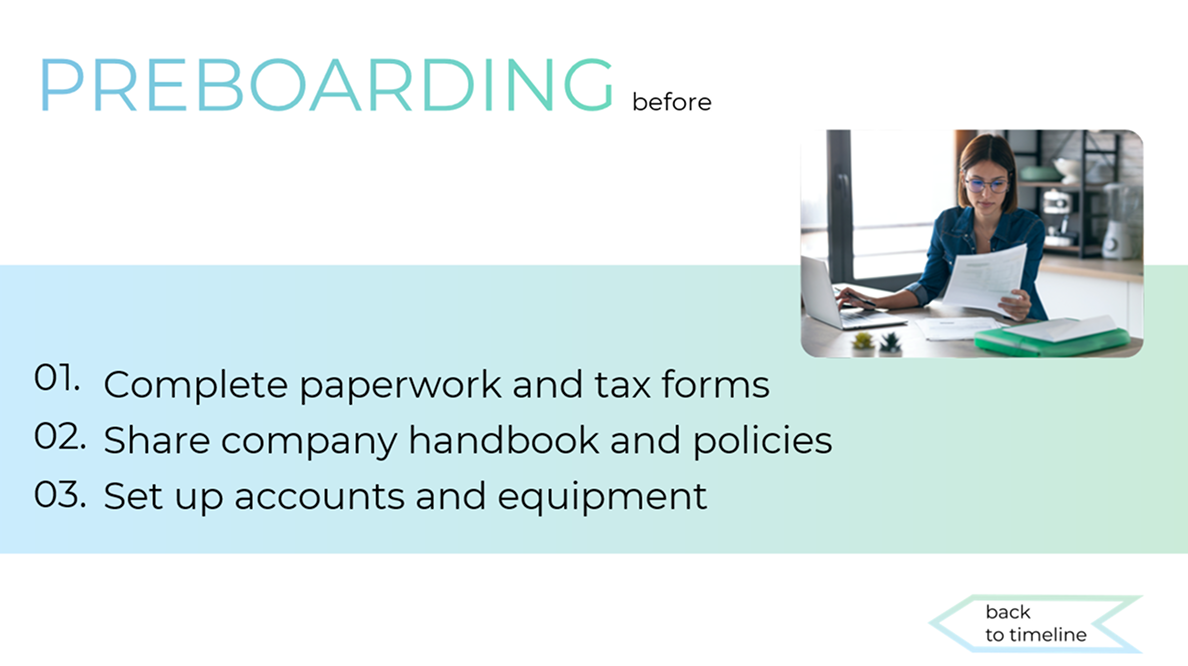
After you apply all the elements, the Animation Pane should look like this: - To give more information about the milestones on your timeline, create a separate slide for each one of them. For example, the following slide is about the Preboarding (milestone 3).
- Create an action button by going to INSERT > Shapes > Action Buttons.
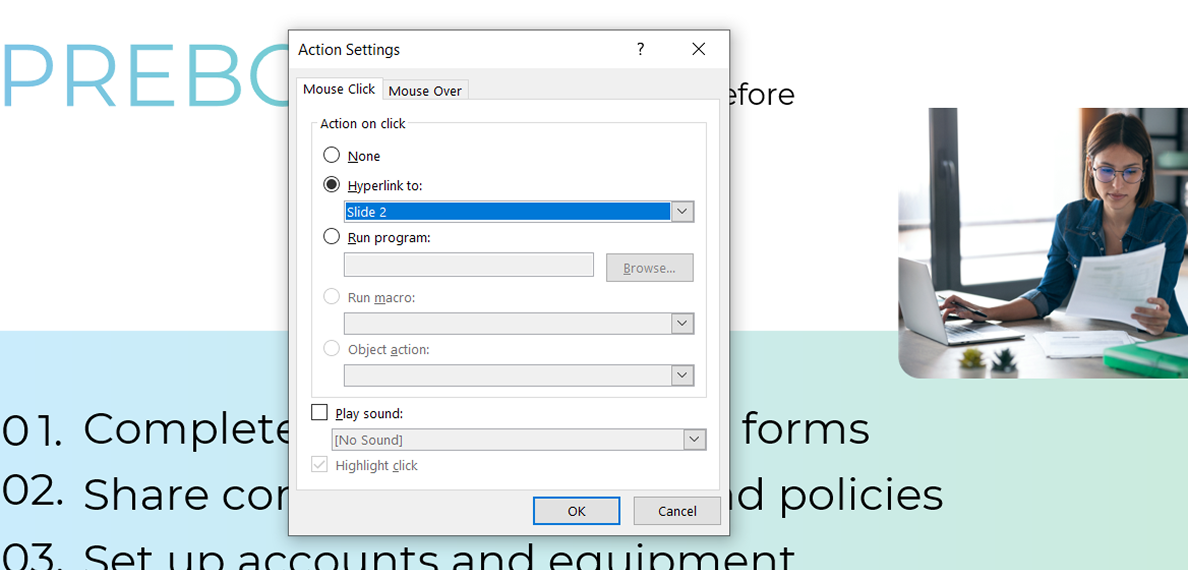
- Place your action button on the slide you need to add a link to and set Hyperlink to: Slide 2 (the slide with the timeline). Now you can return to the slide with the timeline by clicking on the action button.
- Add this action button to every slide so a user can go back to the timeline from any descriptive slide in your PowerPoint presentation.
After everything is done, the presentation will look like this in Slide Sorter VIEW.
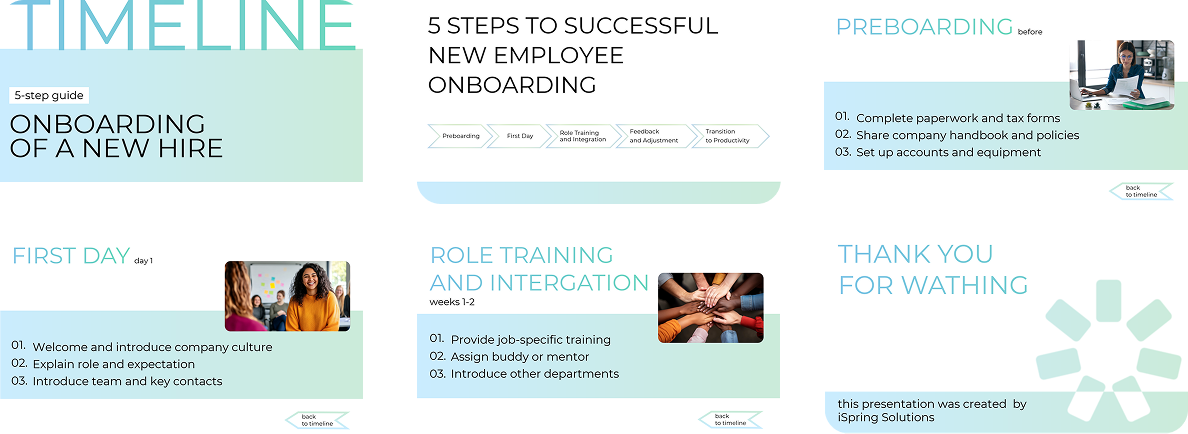
Don’t want to set up hyperlinks and animations on your own? Just download our interactive PowerPoint timeline template.
How to Create a Timeline Faster and Easier with a PowerPoint Add-in
Building your timeline using PowerPoint provides many benefits. You can create custom element shapes, colors, animations, etc. You can literally make any design you want using only PowerPoint’s functionality. However, as you can see from this article, it’s a fairly creative, complex, and therefore time-consuming process. There’s a much simpler way of doing it with iSpring Suite.
iSpring Suite is a complete eLearning content authoring tool that works as a PowerPoint add-in and can greatly speed up the timeline creation process. While it doesn’t provide as much freedom of customization as SmartArt, it saves you tons of time and effort. And that’s not a minor advantage when you have a lot on your plate.

One of iSpring Suite’s features lets you create various interactive visuals, or interactions, including a timeline, quickly and effortlessly. Here’s what an interactive timeline created with iSpring Suite looks like:
To make a similar timeline, follow this brief guide:
- Download the iSpring Suite free trial and install it on your computer.
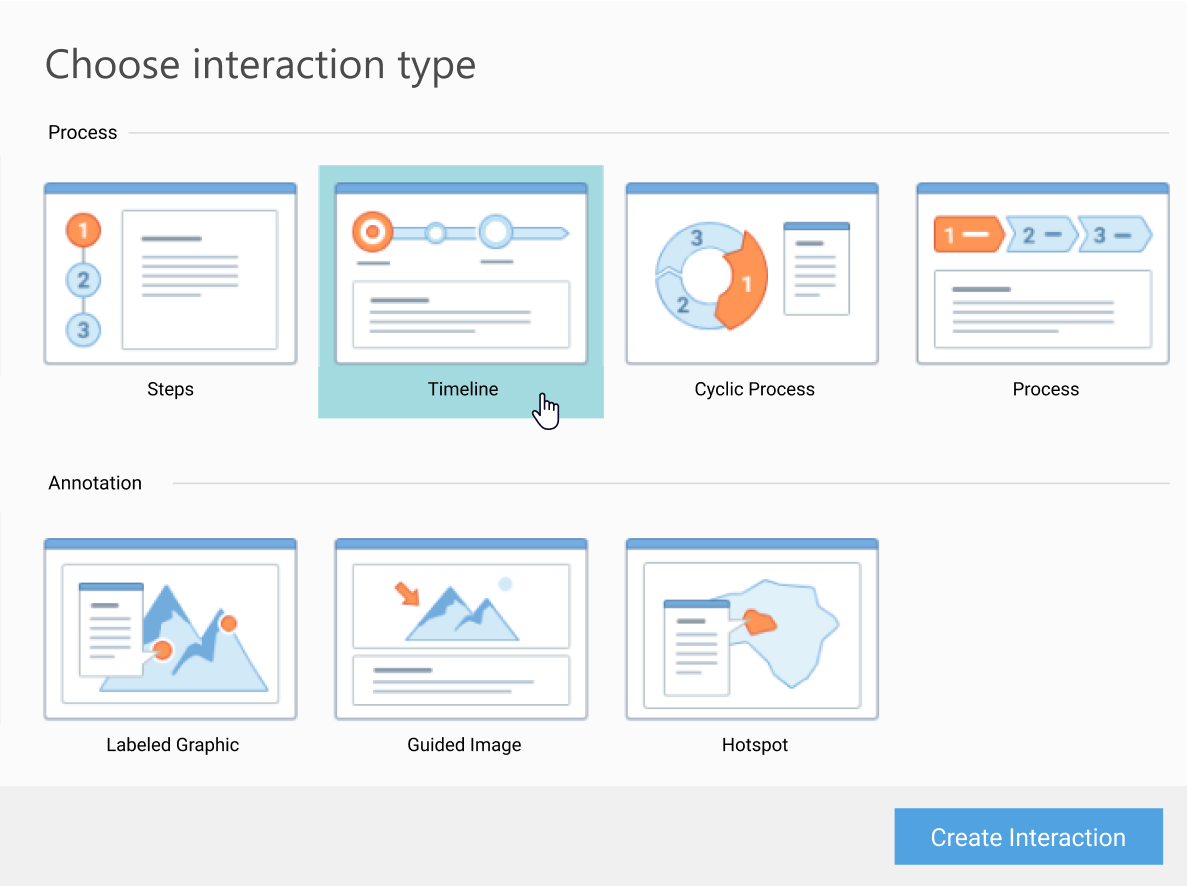
- Open iSpring Suite and select the Interaction tab on the toolbar.
- You’ll see the menu with 14 types of interactions. Choose Timeline.
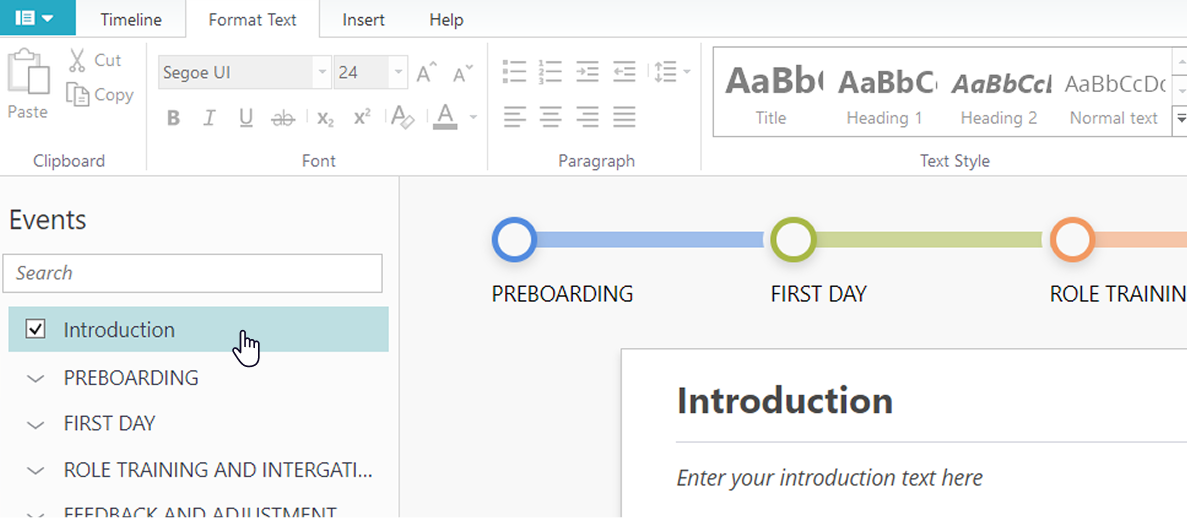
- To add a new milestone, click on Add Period or Add Event on the toolbar.
- Add an introduction/summary to your timeline by selecting the relevant box.
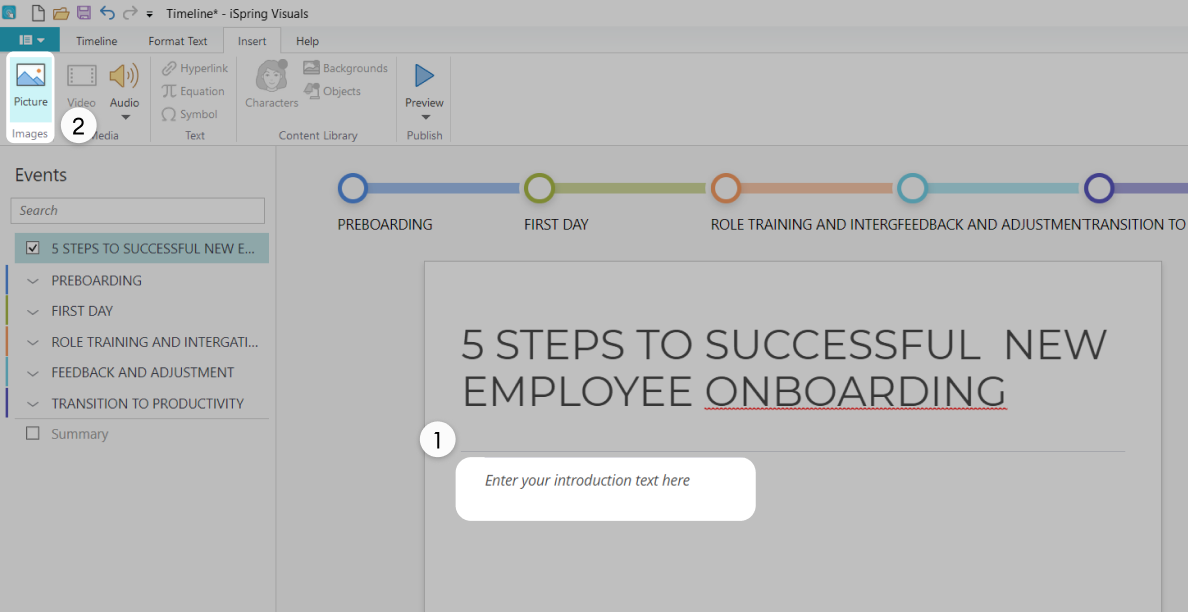
- Choose a slide in your presentation and click on Insert on the upper panel. Enter your event description and choose the type of multimedia you’d like to add.
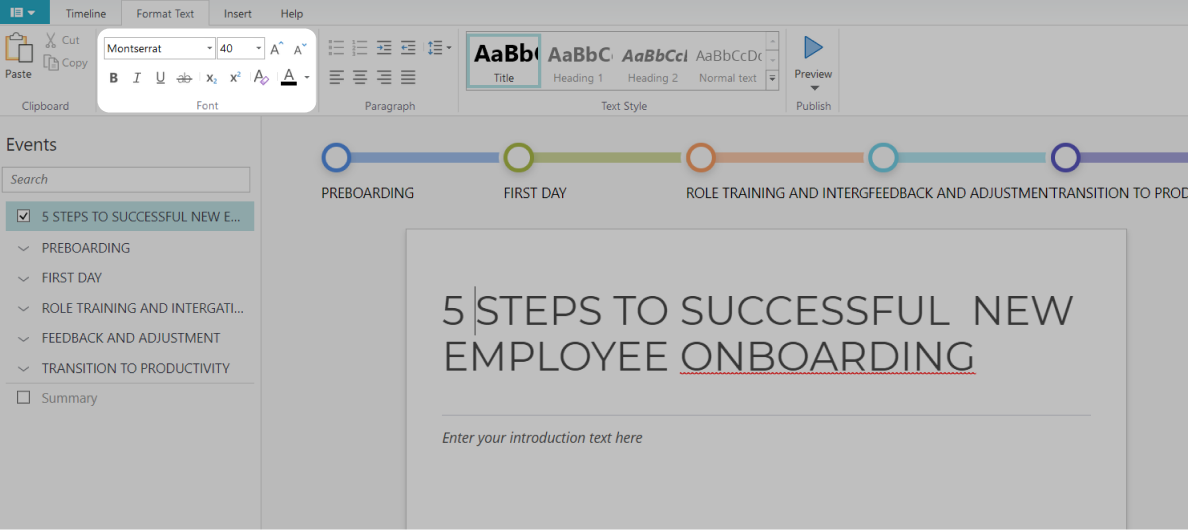
- Click on Format text to change fonts and text size.
- Customize the slide in Properties. Here you can adjust the color scheme.
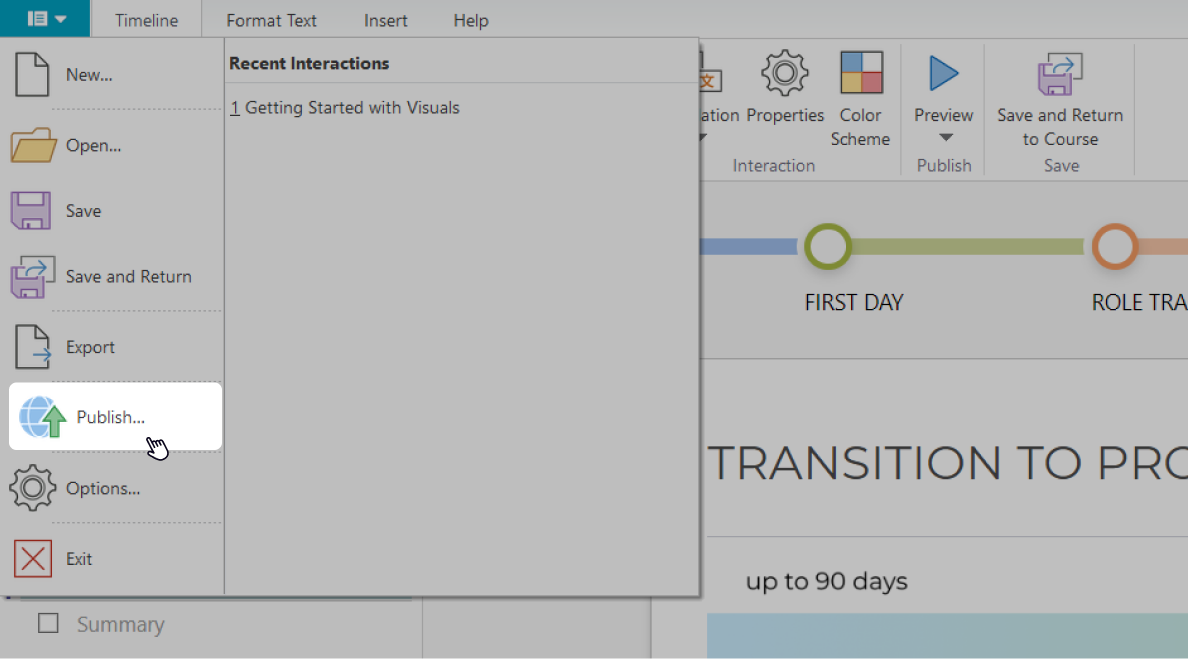
- Once your interaction is ready, click on Publish.
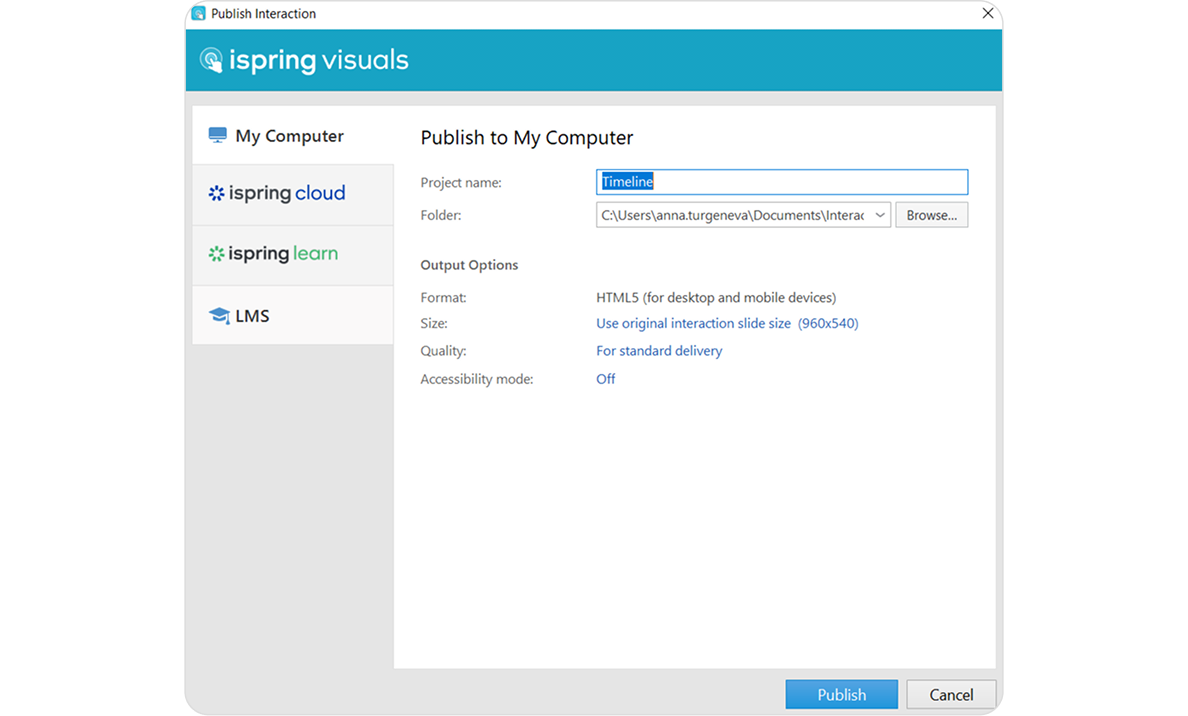
- Decide where you want to place your timeline. You can save it on your computer in HTML5 format and then send it online via email or upload it to an FTP.
- If you want to upload it to your LMS, choose LMS and select the eLearning format you need from the drop-down list — SCORM 2004, for example. To learn more about the various formats and why they matter, read our eLearning standards comparison guide.
Congratulations! Your interactive timeline is now ready to go!
And that’s just a small portion of what iSpring Suite is capable of. For example, you can create interactive presentations, add quizzes, and even design eLearning courses with it! Want to learn more? Book a free 30-minute live demo and get answers to all of your questions.
How to Add a Timeline from Another Software Into Microsoft PowerPoint
Another way to complement your slide deck with a timeline is to create it in another software, copy it, and paste it onto your slide. Simply export it from a tool like Microsoft Project or Excel, Canva, Adobe Photoshop, or any other app as a JPG or PNG to insert the timeline into your PowerPoint presentation as an image. However, this way, your timeline will only work as an illustration because you won’t be able to add interactive elements.
For more ideas on which apps to use, check out a comprehensive list of the best timeline makers you might like.
FAQ on Making Timelines
✓ What is the best way to display a timeline?
This depends on what you prefer. But if you want your viewers to perceive and retain the information displayed on the timeline better, it would be best to opt for an interactive timeline. Besides, with tools like iSpring Suite, creating timelines is a breeze.
✓ What is the best Microsoft program for creating a timeline?
If you need to create a timeline for your presentation, it would, of course, be better to do this right in PowerPoint — either manually with SmartArt or with a specific add-in. But you can also build a timeline in Microsoft Word and Microsoft Excel. The principle is the same as with PowerPoint — you should use SmartArt graphics. These tools allow you to select from dozens of timeline layouts and change the colors to fit your project. You will then be able to copy and place the timeline on a PowerPoint slide if needed (see the “How to Add a Timeline from Another Software Into Microsoft PowerPoint” section above for details).
✓ How do you create a timeline with dates in PowerPoint?
To make a timeline in PowerPoint with dates, you just need to name the periods with dates and add the sequence of years to your timeline.

✓ Are there timeline templates in PowerPoint?
Yes, there are some native, ready-made templates integrated right into PowerPoint. You can access them from the “File” menu on the PowerPoint ribbon (File > New) when designing a new presentation and typing “timeline” in the search bar. However, this selection may prove insufficient for your needs.
Another option is to use the template we’ve made for you, or you can go to the Microsoft library of templates and download one there. But keep in mind that you need to have a paid subscription to Microsoft 365 if you want to get access to premium templates both in PowerPoint and the Microsoft library.
Final Thoughts
Timelines are an easy and effective way to illustrate sequential events, explain how things change over time, and visualize plans. However, designing complex timelines manually in PowerPoint can be a tedious and time-consuming task.
To save time and effort and make a great-looking interactive timeline quickly, use iSpring Suite as an add-in. Download the 14-day free trial and supercharge your timeline creation process. No credit card details required.




 To fill in the text of your timeline more easily, use the Text Pane. Just click on your timeline, and it will appear automatically.
