How to Create an Interactive Video in PowerPoint
Videos enhance the learning process by making it more visual. Rather than just explaining how to create a table in Excel, it's more effective to show the process on screen. This way, learners can watch, follow along with the instructor, and understand the concept more quickly.
In this article, we'll guide you on how to create an interactive video course fr om scratch using the built-in tools in PowerPoint.
What Is an Interactive Video?
Think of an interactive video as a first-person computer game. You become the main character, and the story unfolds based on your decisions. To reach the conclusion, you need to make the correct choices.
Interactive videos are built around real-life scenarios. You engage in tasks such as delegating responsibilities to a team member, conducting an interview, or calming a dissatisfied customer in real time.
How to Make an Interactive Video
Creating an interactive video usually involves writing a script, crafting a storyboard, choosing actors and locations, and setting up lighting, filming, and editing. It's essential to plan these steps ahead of time.
The PowerPoint phase is the final and crucial part of the project, as it determines the final outcome. Let's focus on this stage.
We'll begin with the basics and gradually move to more complex elements: first, add music, then create animations, and finally, incorporate videos into the slides. Overall, it’s a straightforward, step-by-step process. Once you master it, you'll be able to create a video course for any scenario with confidence.
Here’s an interactive video that we’ll make today:
Slide 1
When you start the course, music plays, and a scrolling line reveals the credits, course title, and a "Start" button on the slide — this is the animation in action. Let's walk through how to set it all up.
Upload music
Music enhances the atmosphere and sets the right mood.
1. Open your presentation and sel ect the first slide.
2. On the toolbar, click on Insert → Audio → Audio on My PC.
3. Add the music and put it below the slide so it's hidden fr om the learner's view.
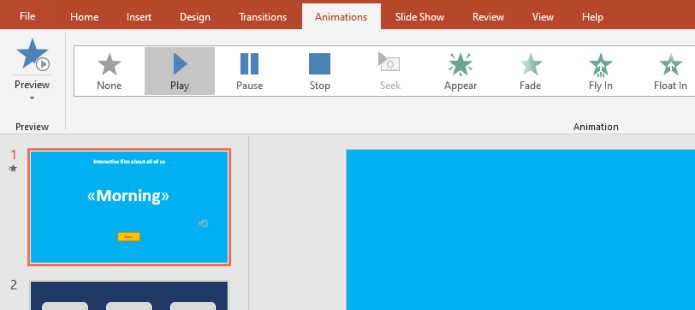
4. To have the music play automatically when the course begins, sel ect the music file, navigate to the Animations tab, and choose Play. If the music plays, you've se t it up correctly. To stop it, press Enter on your keyboard.
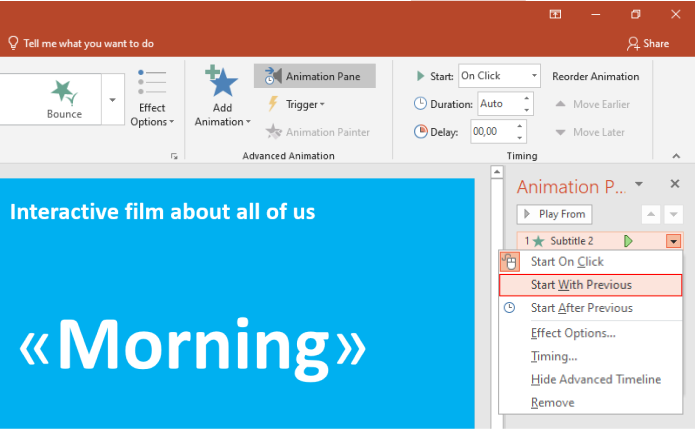
5. On the toolbar, click on Animation Pane. In the window that appears, select your music file and choose Start With Previous. Now, the music will begin as soon as the user launches the course.
Animate the credits
1. Highlight the line "Interactive film about each of us" on the slide. Go to the Animations tab and select the Appear option. This will create a new effect in the animation pane.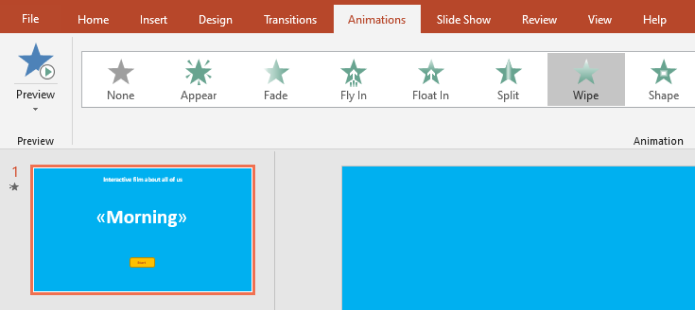
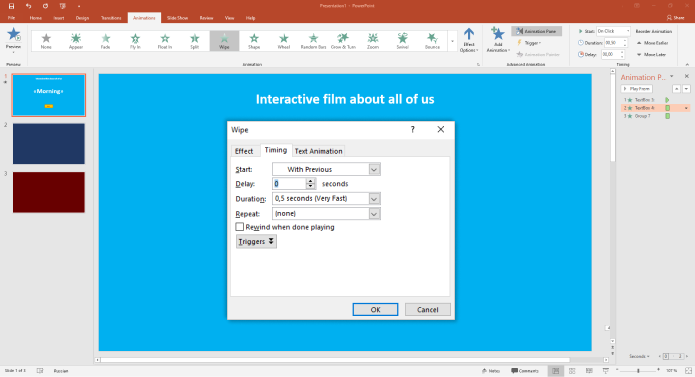
2. To make the text appear smoothly, letter by letter, open the Animation Pane and click on Effect Options.
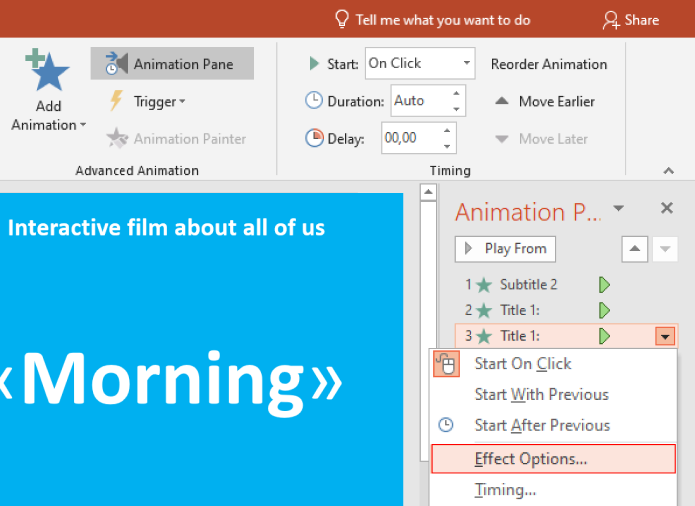
3. In the opened window, adjust the settings. Choose the direction From Left so the scrolling text moves fr om left to right.
4. Switch to the Timing tab. In the Start line, select With Previous. To ensure that the text appears smoothly, set a delay of 4 seconds and a duration of 3 seconds.
Now, the first line on the slide will gradually appear when the course begins. If set up correctly, it will look like this:
Animate the button
2. In the Animation Pane, you’ll see an effect labeled button. Select this effect and click on Start With Previous.
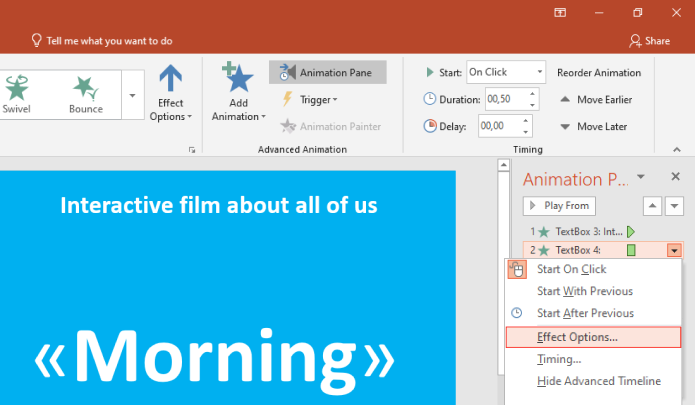
3. To ensure that the button appears last on the slide, go to the Effect options and set a delay of 12 seconds under the Timing tab.
Add a hyperlink to the "Start" button
When the "Start" button is clicked, the user should be taken to the second slide. To achieve this, set up a hyperlink.
Right-click on the button and select Hyperlink → Place in This Document → Slide 2 → OK. The hyperlink has now been set up.
What we have

Slide 2
When the user navigates to the second slide, they see an introductory video, followed by a branching point with two response options. Let's go through how to set this up.
1. First, click on Insert → Video → Video on My PC and select the first video you’d like to add.
2. To ensure that the video plays automatically, add an animation. Go to the Animations tab and choose Play. If you hear music, you've done it correctly. To stop it, press Enter on your keyboard.
3. Next, click on Animation Pane in the toolbar. In the window that opens, select your video file and choose Start With Previous. This ensures that the video will begin as soon as the user progresses to the second slide.

Now the video is overlapping the menu with the two response options. To move it to the background, right-click on the video and select Send to Back.
Add animation to response options
After the video ends, the background darkens, and a menu with two response options appears. Here’s how to add animation to the response options.
Select the dark background and two response options on the slide, then add the Fade animation to them.
In the Animation Pane, three new objects will appear: Picture 1, Picture 2, and Overlay. Click on the top object with the left mouse button and choose Start After Previous. See below how to do this:

Add hyperlinks to answer options
In the course, the second slide serves as a decision point. The storyline changes based on the user's choice. If you choose to sleep for another half hour, you'll be late for work. If you wake up with the alarm, you'll have time to eat breakfast and get ready without rushing.
Setting this up is straightforward: "Sleep for another half hour" directs you to the third slide, while "Go for a run" takes you to the fourth slide. Let's configure these hyperlinks.
Highlight the "Sleep for another half hour" option on the slide and right-click on it. Fr om the menu, select Hyperlink → Place in This Document → Slide 3 → OK.
Do the same for the "Go for a run" option, linking it to the fourth slide.
What we have

Slide 3
This is a plot twist in the course. Users reach this point if they choose to sleep for another half hour.
Upload the video and set it as the background
Add animation to the banner
When the video finishes, this message will appear: "Every morning I tell myself," along with a "Rewind time" button. This utilizes the Fade animation, just like on the second slide. You can configure it the same way here.
Add a hyperlink to the "Rewind time" button
Clicking on the "Rewind time" button takes users back to the second slide, allowing them to reconsider their choice. To set this up, right-click on the button and choose Hyperlink → Place in Document → Slide 2 → OK.
Slide 4
Getting up early and having breakfast is the correct choice in the course. If the user makes this decision, they will proceed to the fourth slide and complete the course. Let's go over how to set it all up.
Add a video as the background
Go to Insert > Video > Video on My PC to add a PowerPoint video background. Animations > Play button in the toolbar > Animation Pane > Start with Previous. Right-click on the video and select the Send to Back optionAnimate the banner
Add a hyperlink to the "Rewind time" button
Clicking on the "Rewind time" button redirects the user back to the second slide, wh ere they can change their decision. To set this up, right-click on the button and select Hyperlink → Place in Document → Slide 2 → OK.
Publish a Course in iSpring Suite
To assign a course to employees, first publish it in iSpring Suite and then upload it to your learning management system. The course automatically adjusts to any screen size, so it's convenient to take it on a computer, tablet, or smartphone.

Related Articles
