How to Share a PowerPoint Presentation Online
Sharing PowerPoint presentations is often problematic when viewing or accessing content. Emailing the file or sharing the source file does not always preserve all elements of the presentation or may not be convenient to distribute to a large number of people quickly. In this article, you’ll learn how to share a PowerPoint presentation preserving the original design and animations, as well as keeping your content safe.
1. Use Presentation Hosting Services
Hosting services provide an easy way to host PowerPoint online with no loss of quality. The advantages are obvious: you can view them through a browser window without the need to use your servers and have the option of using content management tools. This means your presentations load faster, are accessible across devices, and you and your team can review and modify them together. We’ll show you how to use hosting services using iSpring Cloud as an example. iSpring Cloud is an online space for storing, sharing, and creating interactive learning content.
How to share a PowerPoint presentation with multiple users by using iSpring Cloud
1. Sign up for iSpring Cloud. Create an account and activate a free trial to try all of the platform’s features.
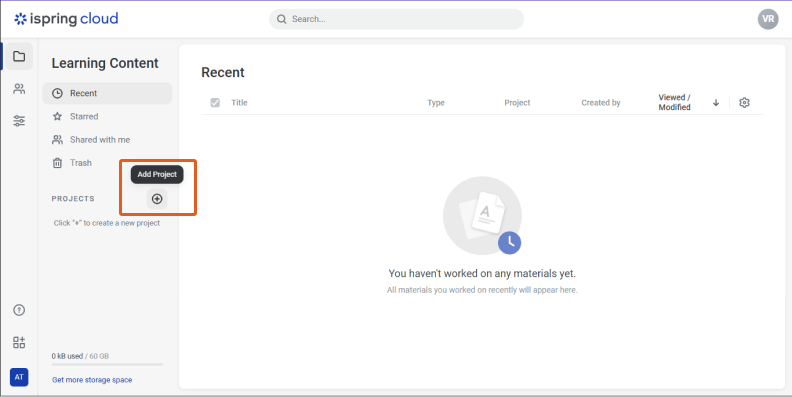
2. After logging in, go to the Learning Content section, where you’ll need to click on Add Project and create a project for your presentation.
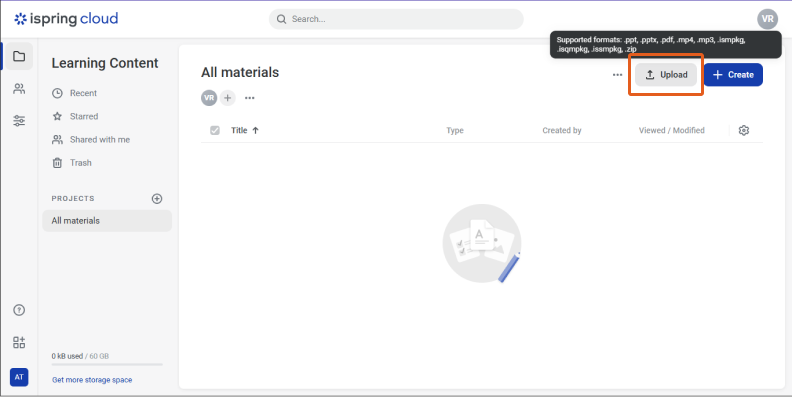
3. In your new project, click on Upload and select the PowerPoint file on your device.
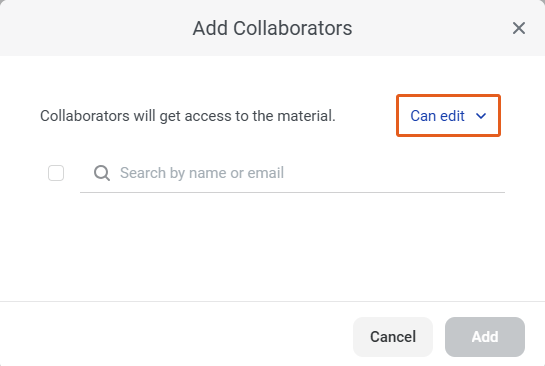
4. Click on Add Collaborators and add the right people by searching by their names or email addresses.

5. Specify the permission level for each participant: View, Comment, or Edit.
Keep in mind that each slide in PowerPoint might look different, and it is important to know the limitations of each platform in advance.
2. Make It a Video
If you need to share your PowerPoint presentation on YouTube or social media, converting it to video is a good solution. Video helps protect your content from being copied, allows easy playback without clicking through slides, and reaches a wider audience. On the other hand, such a presentation will not be interactive and will take up more space, especially if it’s in high resolution.
Creating video right in PowerPoint
1. Select the presentation that you want to convert to video.
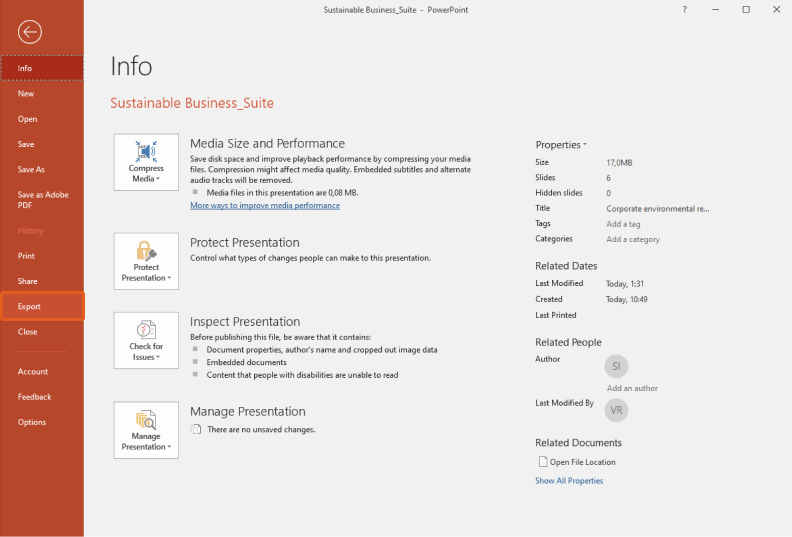
2. Go to the File menu, click on Export, and a dialog box will appear. Select Create Video.
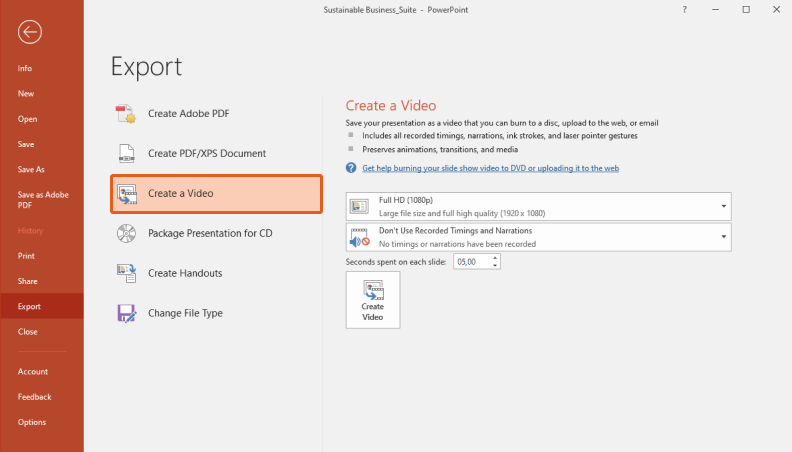
3. Select the appropriate resolution. HD is for large screens, and FullHD is good for YouTube.
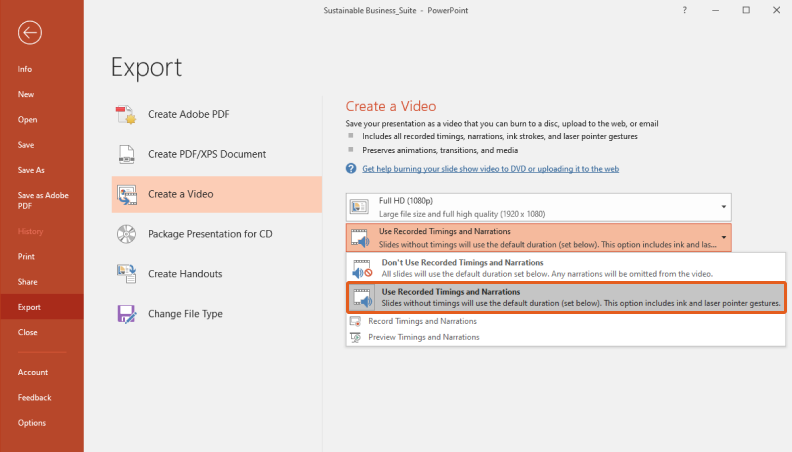
4. If you have voice-overs or timed transitions, select the Use Recorded Timings and Narrations option.
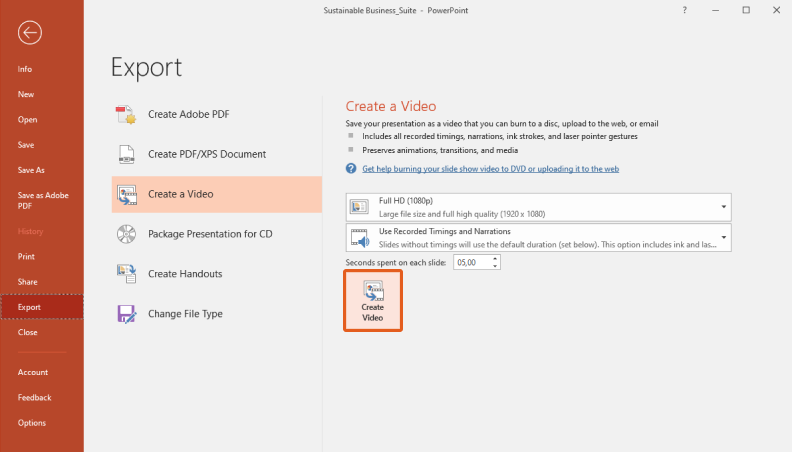
5. Click on Create Video, choose a folder to save to, and select the MP4 format.
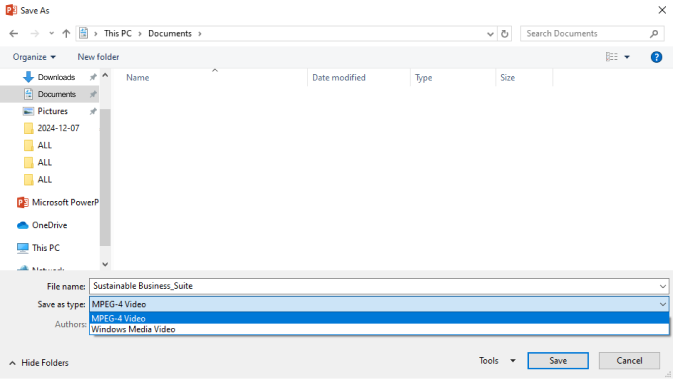
This method works for Windows. If you’re using macOS, see our detailed article: “How to Convert PowerPoint to Video.”
Now you’re ready to publish your video presentation on YouTube and share the link to it on Facebook, LinkedIn, and other social media platforms. You can also email an MP4 video as an attachment or integrate it into a website.
It’s important to remember that standard PowerPoint is great for simple presentations. But if you need complex animations or effects, or want to enrich your content with interactions, it’s better to use iSpring Suite, an authoring tool that’s fully integrated with PowerPoint. It has a built-in converter that saves all the presentation elements, like animations and transitions, and can upload videos directly to YouTube. Once installed, the iSpring Suite tab will appear in the PowerPoint panel, and you can convert the file in just a few clicks.
3. Convert to HTML5 and Embed
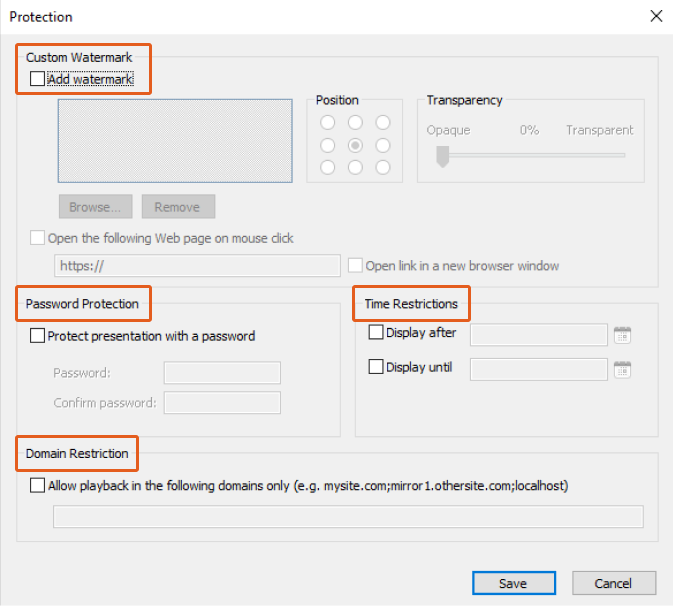
Another way to share a PowerPoint presentation online is by converting it to HTML5. This is a great choice if you want enhanced data protection. Third parties won’t be able to alter the slides in this format, and you can add extra protection, like watermarks, passwords, or time and domain restrictions.
To quickly convert files, you can also use iSpring Suite. This tool makes conversion a simple 5-step process.
How to convert PowerPoint to HTML5 using iSpring Suite:
1. Get a free trial of iSpring Suite. Open your presentation in PowerPoint.

2. Click on the iSpring Suite tab in the toolbar and click Publish.
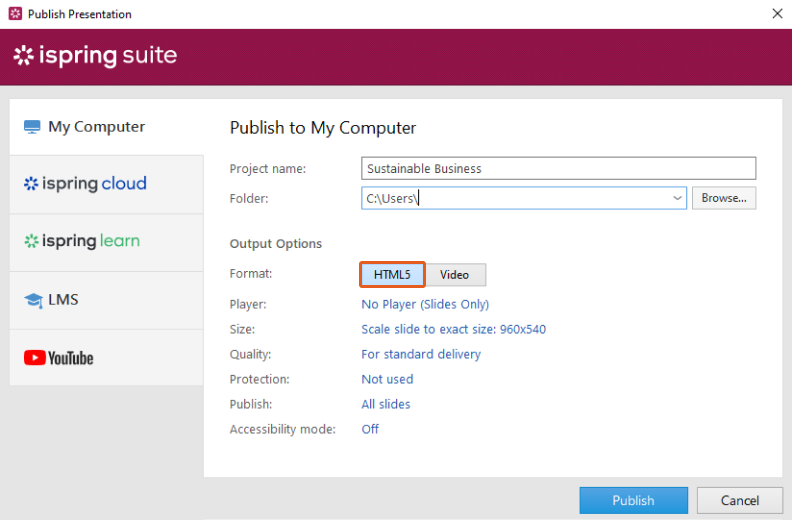
3. Select the HTML5 format for the conversion.
4. In the Protection section, set the protection method – watermark, password, or time and domain restrictions – to control access.
5. Click on Publish and save your changes.
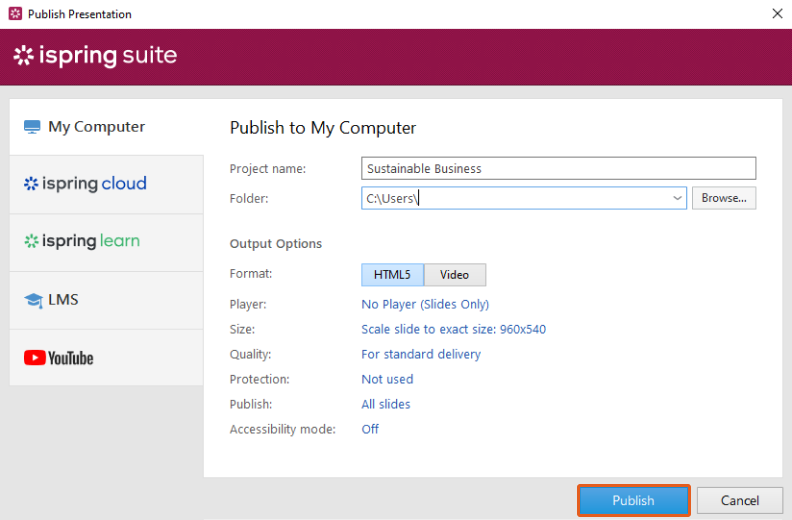
After conversion, you’ll have an HTML5 file that will take up less space and open your slides directly in the browser window, preserving all images, videos, and animations exactly as they are in the original. You can also upload your presentation that’s in the HTML5 format to a server or website with ease – read our guide on how to do this: 3 Ways to Embed PowerPoint Presentations into a WordPress Website.
4. Share via an LMS
If you’re making presentations as part of online training or education projects, the best way to share presentations online would be to use an LMS. An LMS like iSpring Learn allows you to centralize access to presentations, define viewing rights for specific groups, and track user activity: number of viewers, their progress, and even which slides they spent the most time viewing. This makes it easy to evaluate training and understand which elements of the presentation are most interesting to viewers.
To do this, you first need to convert it to the SCORM format, an international standard for online courses that works in any LMS.
Steps to convert PPT to SCORM with iSpring Suite:
- Download and install iSpring Suite. You can use the free trial version to test all features and handle urgent tasks.
2. Open your PowerPoint presentation and click on the iSpring Suite tab on the dashboard. Click on Publish.

3. From the menu that opens up, select LMS and the correct version of SCORM that your LMS supports.
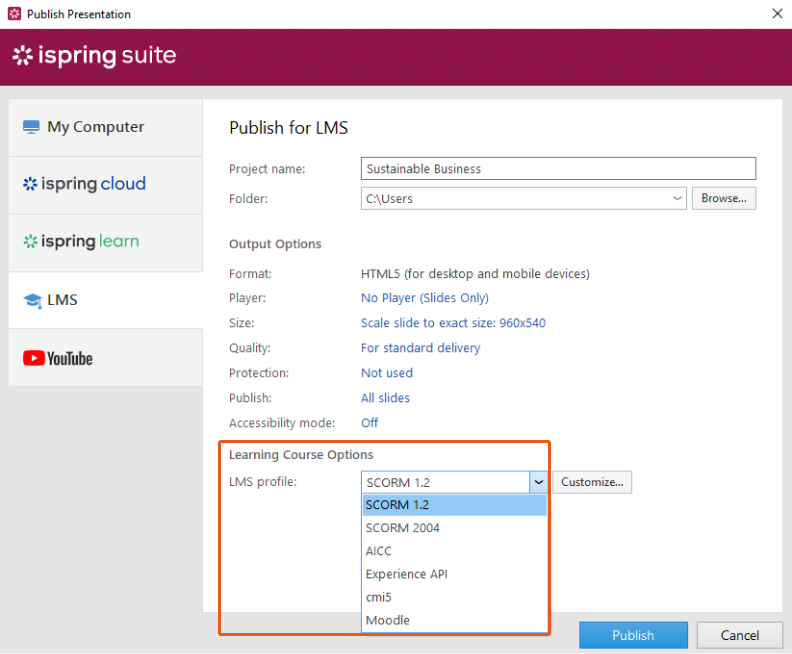
4. Click on Publish. The conversion process will take a few seconds.
When the conversion has been completed, you’ll have the SCORM course in ZIP format. You can now upload it to your LMS, making your presentation available to your learners as a course. Also, see the SCORM Wrapper article on how to convert a PDF or MP4 presentation into SCORM if you have one of those instead of a PowerPoint presentation.
Read more: How to Convert PowerPoint to SCORM
5. Share the Source File
Probably one of the most popular ways to share presentations is to upload your PowerPoint file to Google Drive and share the link. This is a quick option, especially if you’re wondering how to share a large PowerPoint presentation without having to deal with complex file transfer settings.
But keep in mind that the person you’re sharing it with might not have PowerPoint or might be using an older version that won’t open your slides. In that case, all the design elements and effects you’ve worked so hard to produce won’t be fully visible. Think about the security risks as well: anyone can copy, modify, and distribute the file on the Internet without your permission. If your content is confidential and you want to restrict access, it’s worth considering more secure sharing methods.
6. Share a PowerPoint Presentation Link
Using PowerPoint’s built-in Share feature, you can upload a file to the cloud and create a link for online access. Via the link, you can share presentations without worrying about file size or compatibility with other devices.
How to create a link to share a PowerPoint Presentation:
1. Open your presentation in PowerPoint.
2. Click on the Share button in the top right corner.
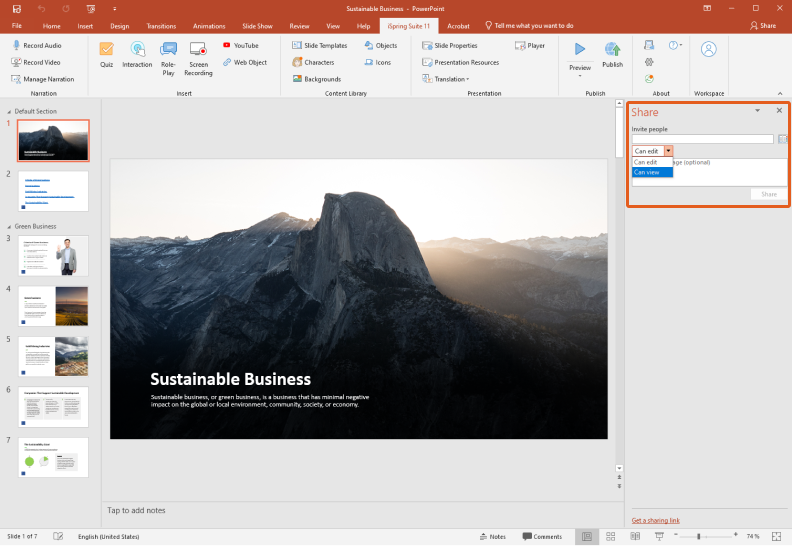
3. If you’re not logged in to your Microsoft account, you’ll be asked to do so.
4. Set permissions: view, comment, or edit.
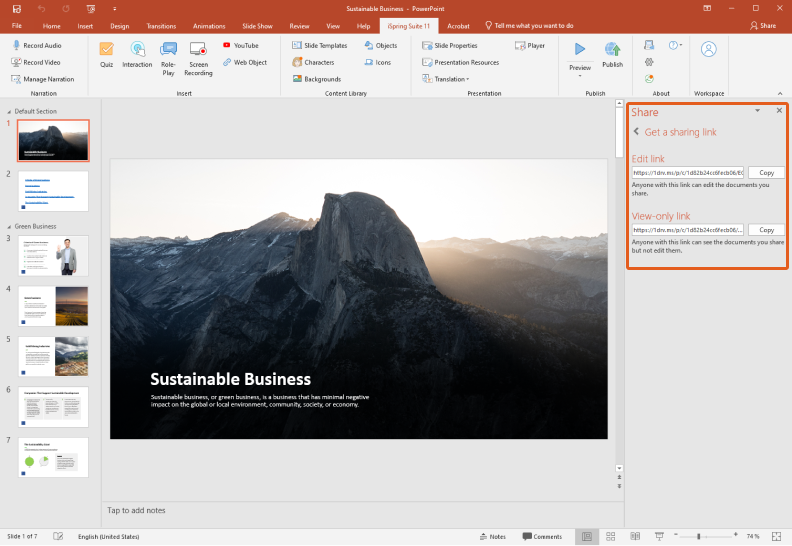
5. Click on Create Link and then click on Copy Link. The copied link can be sent to anyone, and access to the file will be restricted in accordance with your settings.
Remember that you need to be logged in to your Microsoft account and have your permissions set up correctly to use this feature.
7. Share via Email
When you email your presentation, you can send the file as an attachment, as a link, as a PDF or XPS file, or even as an Internet fax. Emailing allows you to send a presentation without leaving PowerPoint, and recipients can open it on any device. However, if your presentation contains a lot of media like images or videos, it may be too large to email. If this is the case, consider compressing the files or using cloud services to link.
How to email a presentation:
- Go to File, click on Share, and select Email.
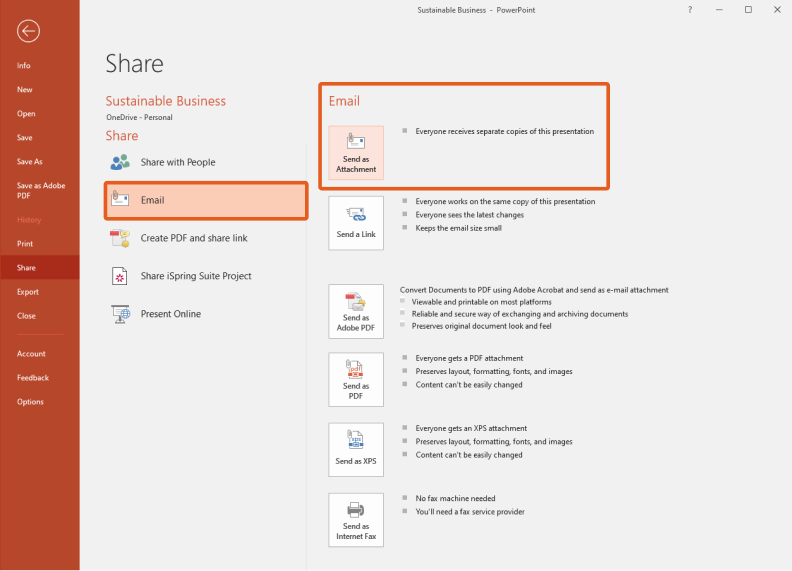
2. Enter the recipients’ email addresses.
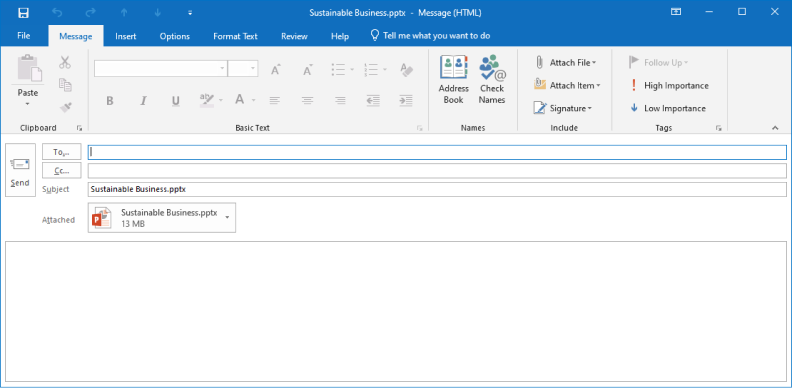
Attachments are usually limited to a certain size, such as 25 MB. Many users turn to cloud-sharing services like OneDrive or Google Drive to handle larger files. PowerPoint’s default attachment option opens the file as an attachment in an email client like Outlook.
8. Share as a PDF
If you need to print PowerPoint slides, you can also convert your presentation to PDF. This option is ideal for distributing and printing static slides with no animations or multimedia effects. Remember to save the original in PPT or PPTX to be able to edit the presentation later on. Converting to PDF is helpful if you want to share a PPT presentation in a static, printable format.
H3 – Converting a PowerPoint presentation to PDF:
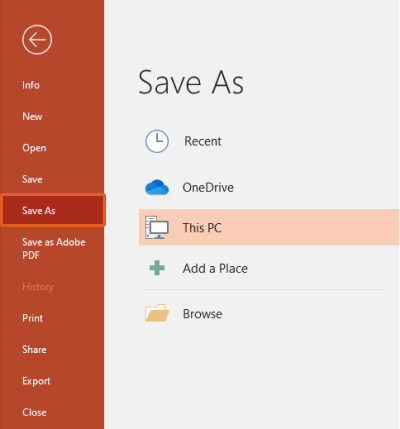
1. Open your PowerPoint presentation. Go to the File menu.

2. Click on Save As.
3. Under File Type, select PDF (*.pdf).
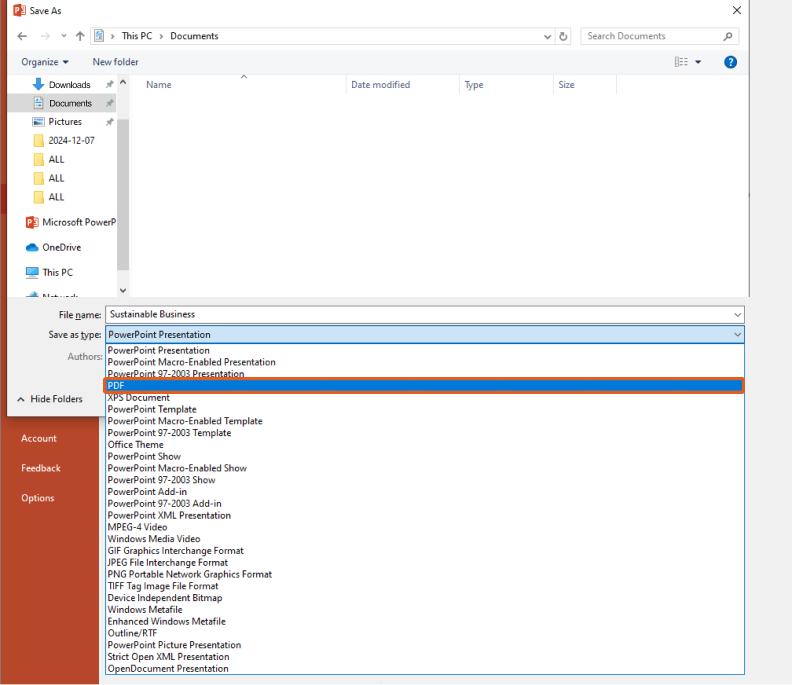
4. Click on Save.
FAQ
1. Can I use hosted presentations to collaborate with colleagues?
Yes, cloud services such as iSpring Cloud not only allow you to upload and share your PowerPoint presentations online but also enable collaboration by adding co-authors with different access rights — view, comment, or edit. This is an ideal way to share a PowerPoint presentation for editing or share a PowerPoint presentation for multiple users. If real-time collaboration is needed, consider screen sharing tools as well.
2. What are the features to consider when converting PowerPoint to video for social media?
When you convert a PowerPoint presentation to video for social media, consider the format and duration of the video. Platforms like Instagram and TikTok have strict time and file size limitations. To improve user experience, use short, concise slides and avoid complex transitions. This is useful if you’re trying to figure out how to share a recorded PowerPoint presentation, how to share a PowerPoint presentation with video, or if you’re relying on screen sharing during online presentations.
3. How can I avoid compatibility issues when using different versions of PowerPoint?
To avoid compatibility issues when using PowerPoint presentations on different devices or with other versions of PowerPoint, consider converting your presentation to a more universal format like PDF or HTML5. Alternatively, you can share PowerPoint presentations online using the built-in share button or cloud services, which ensures that your presentation stays intact regardless of the version of PowerPoint being used. Also, you can utilize the presenter view to ensure that you have all your notes, even if some features differ.
To Sum Up
Now you know various ways to share a PowerPoint presentation with others. Remember that each option offers unique features: some provide high quality and access control, while others may be more convenient and quicker. Whether you’re uploading the source file, converting to HTML5, or using the share button, choose the method that best suits your goals.


