Instructional Video Made Easy: Types, Costs, Guides, and Tips

In today’s training environment, videos are everywhere. And if you aren’t creating them, you’re likely falling behind. According to Wyzowl’s annual State of Video Marketing Survey 2021, 69% of people prefer watching a short video to articles (18%), infographics (4%), presentations (4%), or e-books (3%). In other words, creating instructional video courses is definitely worth a try — especially when it’s possible to do so without breaking the bank.
What Is an Instructional Video?
An instructional video is any type of educational video. It’s a general term that unites different types of videos that contain educational information, such as a micro video, a tutorial, or a video lecture. We’ll talk about these different types further on in this article.
Benefits of Instructional Videos
For a long time, a big hurdle for creating instructional videos was its production cost and complexity. Traditional presentations, instructions, and articles seemed, on the whole, to be safer and easier to deal with.
Today, when a smartphone with a good camera is in almost every pocket, we can find thousands of video tutorials on YouTube, from how to make a burger to how to build a rocket from scratch. We got used to video content and now we expect it. But why do we like video content so much? That’s because it is:
- Simple
Instead of writing mountains of complex instructions, you can simply show it in action.
- Personal
In addition to being self-explanatory, video adds a personal feel and real-world context to the learning material.
- Entertaining
This, of course, relates only to well-made videos. If you create really top-quality content for your trainees, they can get as excited and engaged as though they were watching a blockbuster movie.
There’s even a curious statistic from Forrester showing that if a picture is worth a thousand words, then a video can stand in for 1.8 million words. But it’s not only about how-tos. Video can also be a versatile tool for onboarding, compliance training, hard and soft skills development, and even customer support.
Again, shooting a video nowadays doesn’t necessarily take expensive equipment, a camera crew, and hardcore software. After all, if YouTubers can successfully do it, you can do it too. Plus, we’ll discuss what options you have for company training and what it takes to create such videos.
6 Types of Instructional Video for Corporate Training
Before you start shooting, let’s determine the type of video that will work for your business goals.
Micro videos
Micro videos focus on a single narrow topic and are brief. You can use micro videos to tell your employees about an update to your product, or basic office rules. To make it engaging, you might want to add animation and music.
Tip: Make micro videos 1-3 minutes long to make sure you don’t lose your trainees’ attention.
Practical-based tutorial
Practical-based tutorials, or hands-on tutorials, are a variation of the game “follow the leader,” which is a great example of learning by doing. Together with an instructor, learners master their hard skills. These may include diverse topics like social media management, programming, or maintenance of a CNC machine.
If you decide on creating instructional videos, this type of video is essential for any job, because it shows how to do something, how to do it right, or how it can be done more effectively.
Tip: Structure your video as a series of small steps, so trainees can clearly understand what they should do and when they should do it.
Software tutorial
This type of instructional video is similar to the previous one, except for one detail: the focus is on teaching how to use some software or web service. As a rule, there’s no video of the instructor, just a screencast and a voice-over.
Unlike standard video lectures, recording high-quality screencasts requires some special features. For example, iSpring Suite allows you to choose whether to record the entire screen, capture a certain area, or simply show an app window. You can also spotlight your mouse actions and add visual annotations so that learners can perform everything you do readily and easily.
Tip: Record video from your screen and webcam simultaneously to provide a screencast with live video comments from the presenter. This will make the final video more alive.
Product demo video
Product demo videos are created to showcase products in action. They can be made in the form of a video tour for software and web services, unboxing, setup, tests, and reviews of physical products such as the smartphone in the video above.
Demo videos can be a part of onboarding product training for newly hired employees or can be used for training staff on new products the company releases on the market. These videos can also be used by your sales team to help clients better understand your product, how it’ll benefit them, and how to actually use it.
Tip: There’s no need to bend over backward to create a video demonstration with perfect quality. An overly polished demo can look artificial and biased.
Video lectures
Video lectures by experts in different fields are the best way to introduce new ideas, share some concepts, and inspire people. They can be created by simply recording a live speech or performance of an expert, or intentionally created from scratch to cover a certain topic.
This type of video works just great not only for in-house employee training but also for marketing purposes. You can share expert knowledge with your potential clients and therefore build trust as a bonus.
Tip: Always record live meetups, webinars, and lectures featuring in-house and guest experts. It’s an inexpensive yet effective way to turn one-time learning sessions into reusable content.
Virtual tour
Virtual tours are a kind of brand video. They may give your viewers a tour around your company’s office or production sites, or take the form of a “meet the team” video or short interviews with the staff.
Virtual tours are great for onboarding and they’re also helpful for HR since they provide candidates with an informal, behind-the-scenes look at your company and make it more human.
Tip: You don’t have to make a “perfect” video because the more simple it is, the more authentic it looks. Nevertheless, use a tripod to avoid the shaky and jerky effect of found footage.
The Cost of Creating Instructional Videos
Instructional videos can be very different: some are shot on camera, some are made with animation, others use only a screencast, etc. So, the overall cost of a single instructional video always depends on the particular case. However, we can calculate an average range of prices, depending on whether you hire someone to shoot an instructional video or you do it yourself.
Creating an instructional video with a team
A typical team consists of a producer, a director, a scriptwriter, a camera operator, and actors. If you decide to add animation to your tutorial, you’ll need to hire an extra specialist. Besides your team, you might need to rent a studio, cameras, and pay travel expenses.
In general, an instructional video created by a team costs from $1,000 to $5,000 per finished minute.
Pros
- Great outcome
Cons
- Expensive
- Time consuming
Creating an instructional video by yourself
You can create a training video on your own without spending a penny if you use free recording and editing software. But such software is quite limited in its capabilities, so the result might not be satisfactory. If you’re eager to create effective eLearning content all by yourself, you’ll need the right tool. Tools like iSpring Suite Max allow you to record your screen, film yourself, mix these formats, and then edit the video in an advanced video editing studio. There you can add texts, animations, sounds, and more. Apart from that, iSpring Suite Max will also help you with other learning or training needs, such as creating engaging online courses, interactive assessments, and dialogue simulations.
Such tools cost around $1,000 per author/year, so if you create 10 instructional videos in a year, a single video would cost you around $100.
Pros
- Professional-looking
- Fast
- Easy
- Cheap
Cons
- Technical limitations
Get a free 14-day trial of iSpring Suite Max and start creating videos right now.
Step-by-step Guides on Creating Instructional Videos
Theory is great, but when it comes to practice, difficulties always arise and you might find it complicated to apply the theory when the entire creation process is quite chaotic. That’s why we’ve prepared 2 step-by-step guides for you. Why only two? Because, while there are many types of instructional videos, we can distinguish 2 basic formats:
- An instructional video with a screen recording
- An instructional video with camera footage
You can have a mixture of these formats, and once you know how to create each of them, you’ll be able to mix them easily.
How to create an instructional video with a screen recording
Instructional videos with a screen recording are very useful for explaining how to use software. You might think it’s easy to create such a video: just start recording your screen using a special tool and stop recording when you’re finished. But, if you do it this way, you might end up with an unsatisfying outcome. To create a truly effective video tutorial, follow these 7 steps:
Step 1: Set your objectives
The first thing you need to do is understand what outcome you expect from an instructional video. For example, your company released a product update and assigned you to create a video about it. In this case, your objectives might be to:
- Inform the audience about the update
- Make sure they understand what benefits the update provides
- Show viewers how to use the new features, so that they can easily do it themselves after watching your video
Step 2: Research the subject
Once you’ve determined your learning objectives, research the topic of your video: talk to SMEs, test-drive your product, perform online research, etc. – whatever you need for your particular case.
Step 3: Identify your audience
Try asking yourself these questions to get a better understanding of your audience:
- Who are your potential viewers?
- How old are they?
- How well do they know the subject?
- What do they like?
Knowing the answers to these questions will help you create a more personalized instructional video that will make a greater impact than one created for an unidentified audience.
Step 4: Create an outline and a storyboard
Summarize the main points of your instructional video in an outline. It might look like this:
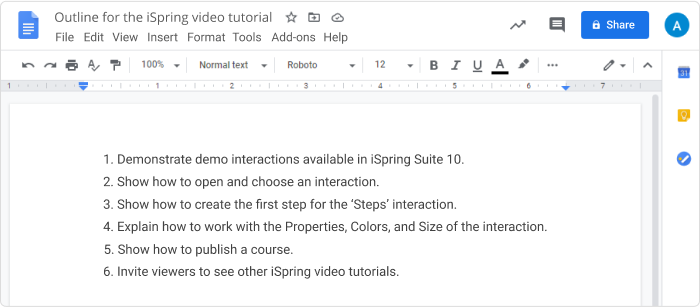
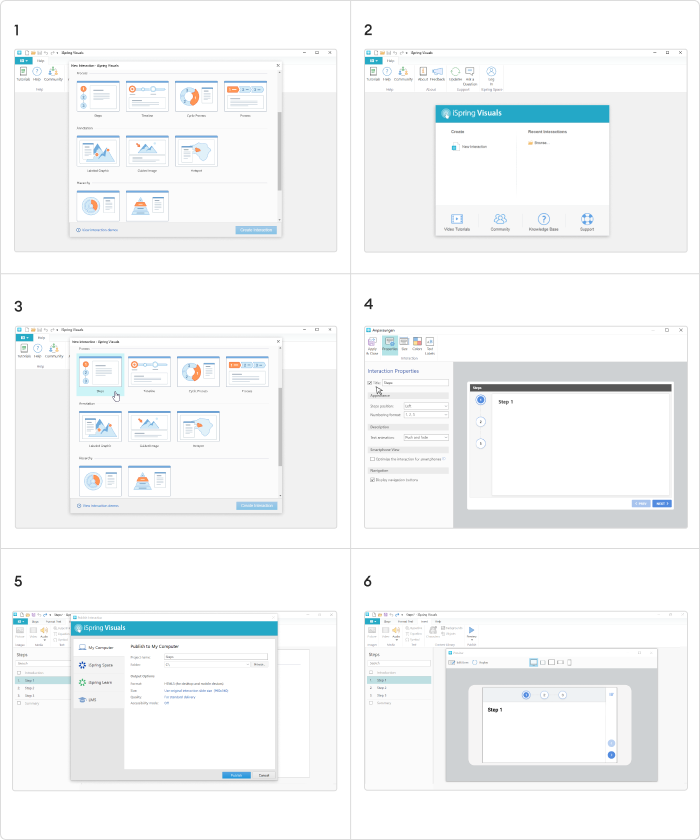
Then figure out what you’re going to show your viewers and in what order. Compile a series of shots into a storyboard that might look like this:
Step 5: Write a script
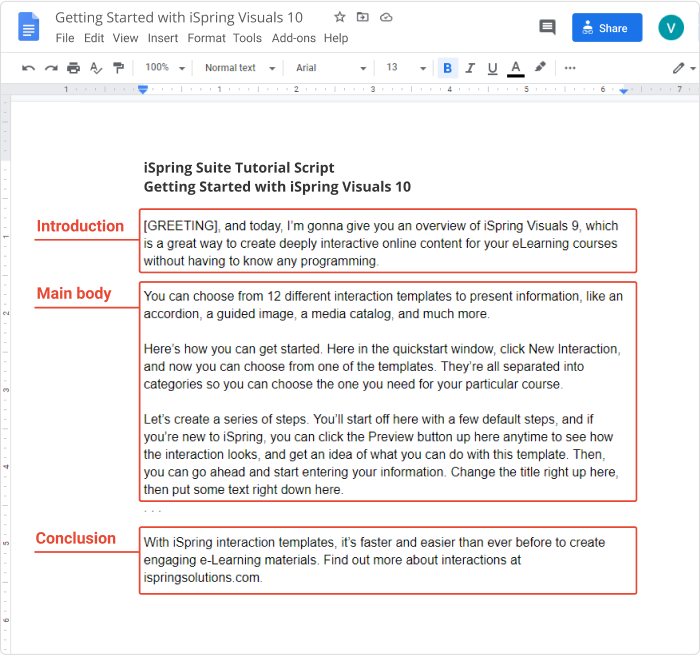
Your script should consist of these three blocks:
- Introduction
Announce the topic and tell your viewers what knowledge and skills they’ll gain by watching the video.
- Main body
The basic rule for any instructional video is: explain everything. Your audience might have limited knowledge on the topic, so you need to make sure they don’t have to struggle to understand the information you give them. Dive into different aspects of your topic, point out details, and make it simple. This way, your learners won’t get intimidated, but will feel that you helped them learn the subject really well.
- Conclusion
Sum up the general points of your tutorial and invite learners to apply the new knowledge and skills.
Here’s an example of a script:
Step 6: Record your video
Select a screen recording software and use it to record your tutorial.
Step 7: Edit your instructional video
With iSpring Suite, you can both record and then edit your video with its advanced video editing studio. Add a voice-over, add sound effects like clicking or system sounds, overlay music, add annotations, images, and animation, etc. Use the editing process to make your video more engaging and illustrative.
How to create an instructional video with a camera
The first steps are the same both for creating a screencast and a training video with a camera. However, the recording process will require a few extra steps.
Follow these steps to create an instructional video:
Step 1: Prepare the recording environment
To make sure your video is technically perfect, you need to take care of 3 factors:
- Image
Set up your camera or smartphone. Use a tripod to have an even, balanced shot. Point the lights where you’ll be sitting during recording.
- Sound
Check your microphone, or use your laptop’s built-in mic. Close the door and switch off the sound on all your devices.
- Flow
You don’t want your video to be disrupted by things like a computer error, or a camera battery losing its charge. So, close all the applications on your computer and charge the camera battery before shooting the tutorial.
Step 2: Make a test recording
Make a short video and watch it to see if everything looks and sounds good. Fix any issues.
Step 3: Record your video
Run through your script, prepare your voice, and start recording. If you use a tool, like iSpring Suite, you don’t need to stop recording every time you make a mistake or forget a phrase. Just keep going – you can edit these pieces out later.
Step 4: Edit the video
Once you’ve recorded everything you need, edit out the parts with mistakes and enhance it by adjusting exposure, color, and other parameters in a special tool. If you use iSpring Suite, you can do all this in its video editing studio. You’ll also be able to add images, texts, animations, and more.
For a more thorough guide, read our walkthrough on how to make a training video with iSpring Suite.
4 Tips from YouTubers for Creating Instructional Videos
Almost 5 billion videos are watched on YouTube every day. In the same way that there are plenty of things to learn from YouTube educational channels, there are just as many ways that we can learn from the techniques YouTube influencers use to present their ideas. Here are four simple things you can easily borrow right now.
1. Create playlists of smaller chunks
You won’t see a messy pile of videos on popular channels. They’re usually organized into playlists. A playlist is a collection of videos on a certain topic that automatically play one after the other.
If you have a long video, say, a recording of a conference, break it down into smaller logical parts and combine them into a playlist (or a learning path if you use an LMS). It’ll be much easier for learners to watch it in small 5- or 10-minute chunks instead of having to look for the place where they left off.
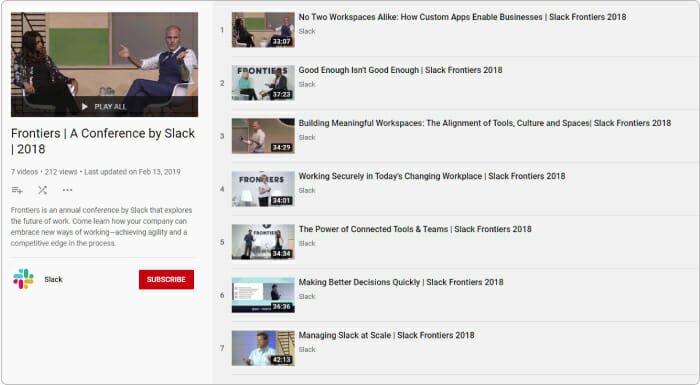
This recording of a Slack conference is divided into shorter parts and organized into a playlist.
2. Create informative thumbnails
A thumbnail is a cover for a video that can give viewers a quick snapshot of what they should expect after clicking Play. When you upload a video, it’s shown with an auto-generated thumbnail, which is a random shot that may not be informative and is often awkward (presenter with mouth open and eyes shut, blurred motion, etc.)
If you add some text on the thumbnail as an explainer of the video, you’ll ease the navigation and gain more interest from the learners since they can quickly see whether the content is relevant for them.
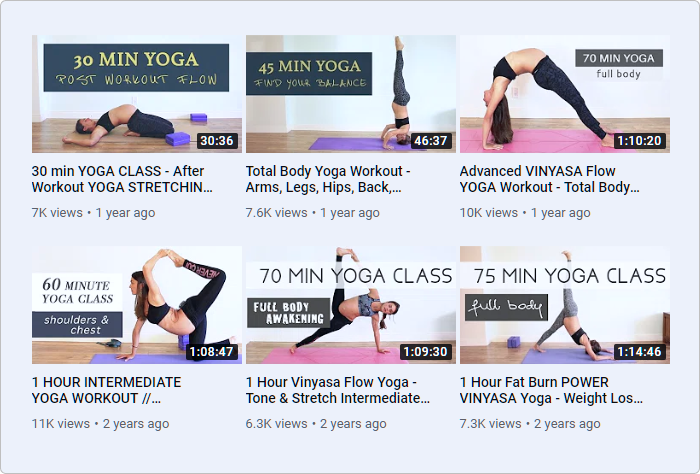
Thumbnails set viewers’ expectations for what they’ll see after clicking Play and how long the actual lesson is.
3. Use closed captions and transcripts
Video is a really great format to demonstrate something, but some learners watch videos with the sound turned off and others still prefer to skim through a text transcript to find the places that are relevant for them. Alternatives such as subtitles and transcripts allow people with different learning styles (or even disabilities) to choose whichever way works best for them.
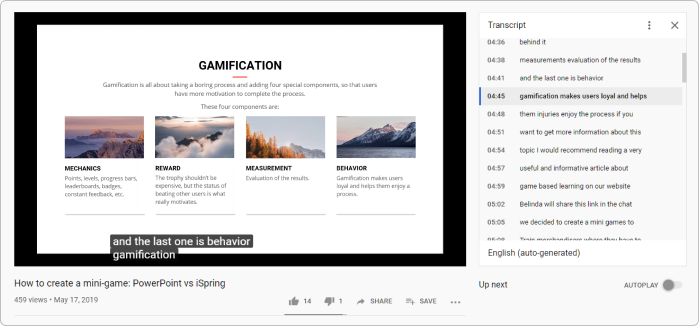
Providing a text transcript allows viewers to skip right to the point that is the most interesting for them.
4. Add annotations
Annotations, or YouTube cards, are special tools that allow viewers to interact with a video. They look like small boxes that pop up during or at the end of a video encouraging you to take action: like the video, subscribe to the channel, answer a poll question, watch another video, or follow a link to a certain website.
If you use YouTube for hosting your instructional videos, or if your LMS allows it, use these features to increase learners’ engagement. If you don’t have such capabilities, you can at least recommend other videos in the description section that may also be useful for learners.

In this video, annotations are used to suggest what to watch next.
Ready to Try Creating Your Own Instructional Videos?
Since making videos is now within reach for anyone with any budget or team size, the only thing to overcome, perhaps, is the wish to keep on doing things as we always have.
Don’t hesitate to try iSpring Suite for free and enhance your training with professional-looking instructional videos like any of the examples in this article or even better. (We’re sure you can!)
FAQ
What should be included in an instructional video?
There is no universal guideline for all instructional videos on what to include in them. It all depends on the particular case. However, to make an engaging, useful video, you might try adding images, annotations, and animation.
Why are educational videos important?
An educational video, or an instructional video, is a way to deliver information. Nowadays, this way of gaining new knowledge is one of the most familiar and preferable for most people. That’s why it’s so important to use this type of eLearning content in training.
How to sell instructional videos online?
There are a lot of learning platforms like Coursera, Skillshare, or iSpring Market, where you can sell your instructional videos.
How can I make instructional videos with screen recording for free?
To make instructional videos for free, you will need free video recording and editing software. Check out the 7 best free screen recorders to find the perfect solution for your case.
What apps allow you to create an online tutorial / instructional video with audio and video?
There are many tools for creating instructional videos. The best ones are iSpring Suite, Camtasia, and Snagit. Learn more about these and other video tutorial software.


